


Cox Tile recreates a heavenly honeymoon setting and wins NTCA Five-Star Project of the Year prize

Cox Tile, Inc. recently won the NTCA Five-Star Project of the Year Artisan Grand Prize for its exceptional work on the Starlit Turkish Spa. It was inspired by the homeowners’ honeymoon memories in Turkey, which included relaxing in an open-air steam bath – called a hammam. The homeowners had a vision of a beautiful custom steam room reminiscent of that hammam in their residential master bath. The project showcases Cox Tile Inc.’s dedication to detail, craftsmanship, and perseverance in overcoming complex challenges.
This story, penned by Cox Tile Owner John Cox and his wife Lori, delves deeply into the scope of the project and the unique challenges that Cox Tile had to overcome to bring its client’s dream to life. The layers of complexity associated with this project seemed daunting, but careful thought and planning with a holistic approach accomplished the homeowners’ vision in their residential master bath. – Lesley Goddin


This endeavor took what we knew was possible in the tile world and had us rethink it all. A soaking tub, custom-reclined seat and flat bench area were requested in a concept where the homeowners could soak and lounge while they looked up at the stars, all within an enclosed steam room with an 8-1/2′ foot high barrel ceiling. TCNA SR614-22 was the method used for the installation.
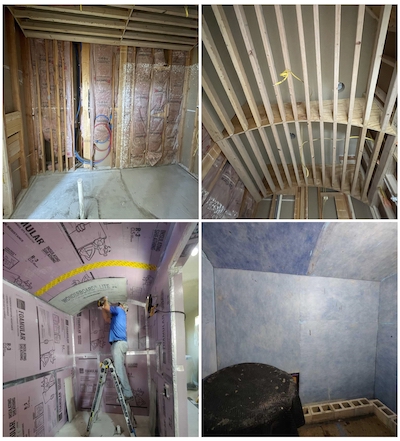
Preparing the room
To bring this concept to reality, the blank slate of the rectangular framed-in room began with an Owens Corning extruded foam board application covered with CUSTOM WonderBoard cement backerboard. The walls were then waterproofed with Nobleseal T/S and Nobleseal 150 Sealant to meet permeability ratings for a steam shower. Slip joints were installed in every and all changes of plane. A QuickDrain USA linear drain was installed to create a sloped but pleasing single one-plane floor. 12″x24″ porcelain tile was carefully laid out with a defining Schluter strip between colors.
A custom lounger in the making
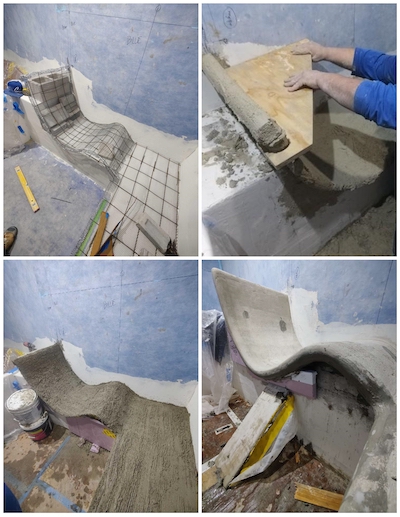
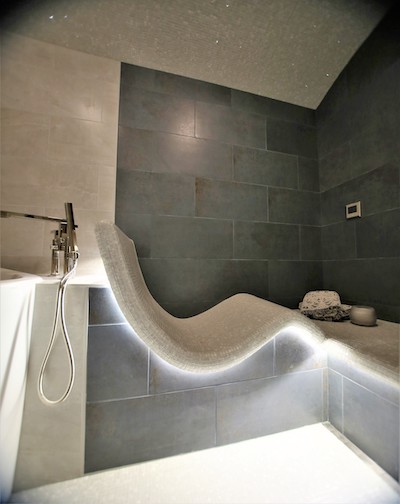
Bench seats were built with cinder block and mud along two walls using stainless and brass threaded support rods for anchoring and stability, creating seating and a base for the custom lounger. A template of the homeowner sitting in her desired state of recline was carefully (and appropriately) traced to create perfectly contoured dimensions. Using a compass and square to lay out the conformation of the seat, a preliminary form was built from metal lath, cement block and stainless and brass support rods, used for their anti-rust properties. Lining the metal form with cardboard allowed the homeowner to test the dimensions first to ensure a perfect fit, prior to mudding this lounger to hug the wall.
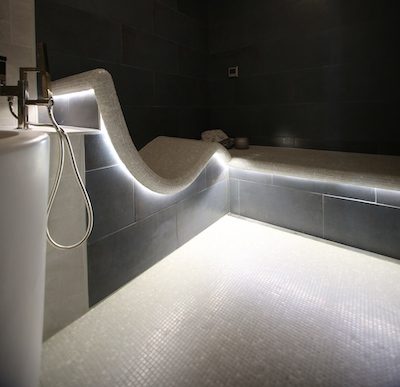
With her comfort approval, work continued by cutting several wooden templates not only to shape and contour the mud over the roughed-in form smoothly with the proper slope for drainage, but also to create rounded edges along the custom seat and bench. There were many compound angles and planes that had to come together cleanly and accurately when building the lounger against the wall. A foam tube was placed under the rounded edges of both the lounger and bench for shaping a hidden conduit-type cavity in the mud under the edge, allowing for the installation of LED light strands to softly illuminate the floor for safety and ambiance. When the final coats were floated, waterproofing was added to the seats for extra protection from the steam.
All hands on deck
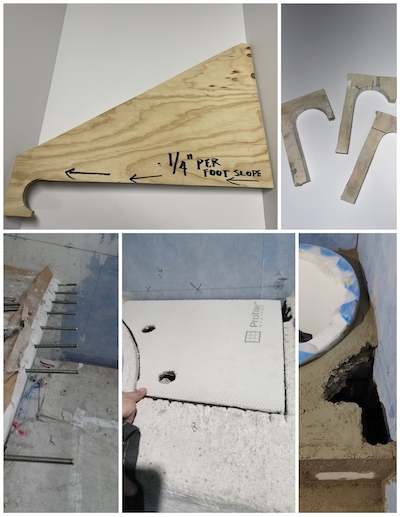
A high “deck” around the rear and sides of the soaking tub was also requested, again building the structure with cement block, support rods and mud with proper slope to drain the surface. Access to plumbing for the tub had to be created within the decked area to accommodate entry of the plumbing lines from the adjacent room, while also maintaining a waterproof surface. A cavity was created in that cinder block base for the plumbers to run their lines. For the actual tub fixtures, a hole was cut in the mud deck and covered with a fabricated a 3/16″ steel plate with holes cut for the fixtures. Then that hole was covered with backerboard for a smooth transition with the mudded surface and the entire structure was waterproofed. All tile was set with LATICRETE Tri-Lite mortar.
Tiling the contours
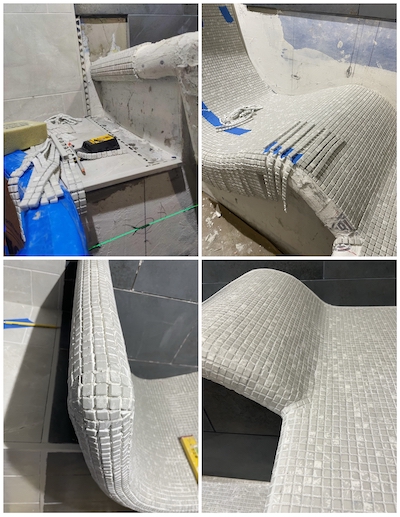
More challenges were waiting when applying the 1/2″x1/2″ porcelain mosaic tile to the deck, rounded-edge bench, and especially the contoured rounded-edge lounger. The layout was calculated for the tile to start from the bottom edge of the round face and traverse back to the wall. The contraction and expansion of the radius and angles of the seat resulted in a tremendous amount of work to cut the mesh-mounted tiny tiles into individual strips and install them one by one to manually create the perfect joint spacing as though the sheets were on a flat surface, to match the rest of the installation.
The rounded edges demanded particular attention as some strips needed tapering and others needed selective spacing to accommodate the curvature on that prominent facial edge. The rounded top and bottom corners of the lounger that curved to the rounded sides were especially intricate, forcing application of the tiny square tiles to appear cohesive and softly rounded. The same 1/2″ x 1/2″ tile was also used on the waterproofed floor and ceiling throughout the entire room.
Hanging the stars in the sky
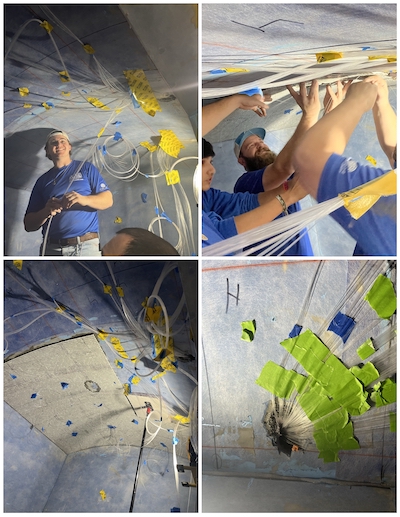
Creating the heavens and the stars is normally a task left to a Higher Power, as the random yet intricate appearance of stars is truly remarkable. Utilizing fiber optics and dizzying ingenuity, we started with a map where 400 tiny hair-like filaments in three different diameters (.5mm, 1mm, 1.5mm) would initiate from two 200-piece bundles. These bundles originated from a controller in the ceiling and needed to be methodically dispersed into zones throughout the 63-sq.ft. barreled ceiling, covered with the same 1/2″x1/2″ mosaic tile.
The strands are simply a medium for transmitting light – that is the nature of fiber optics. Light cannot emit from the end of the strand if it is crimped at all. This means the strands could never overlap each other under the tile (also preventing lippage) and must not encounter any angle that could compress the tiny filaments in any way.
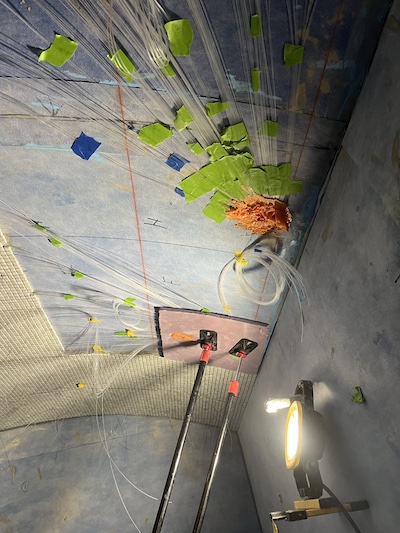
The change in planes from the ceiling entry points to the surface of the ceiling, across the curved expanse of the ceiling, then routing the filaments to peek out of the grout joints between the tiles proved to be vexing. The challenge was preventing the hard plastic strands from bending at too sharp of an angle, thus suppressing light transmittal. We tapered the two entry holes to allow a milder entry angle and then planned for a specific number of strands to be included in each 12″x12″ sheet of tile. Randomizing the placement and sizes within each sheet proved to be an exercise in organizing, then reorganizing all the way back to the sourcing entry holes with each sheet of tile set, constantly manipulating the pattern for the desired star effect across the entire expanse of the ceiling.
Another bridge to cross came after every sheet was set with all the strands in place – we had to seal the entry holes to maintain the permeation rating for the steam room without damaging the filaments. We used fire-grade insulating expanding foam to seal the holes, keeping them troweled flush as it hardened, and applied a waterproofing patch for the final seal. Then the last sheet of tile and filaments were set over those areas.
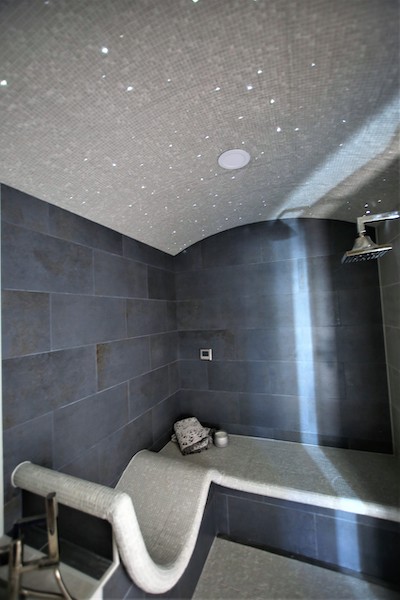
All steam room tile was grouted with MAPEI Kerapoxy grout with Mapesil T silicone caulking to seal the joints properly. The 400 fiber optic filaments were then clipped flush with the grout.
Voilá – we created a spa-like heaven on earth, turning a conceptual idea into a dreamy reality!
View the Project Award Video to watch the project in all its intricacies unfold.


