


Sharp corners, especially in shower installations, can be safety hazards for end users
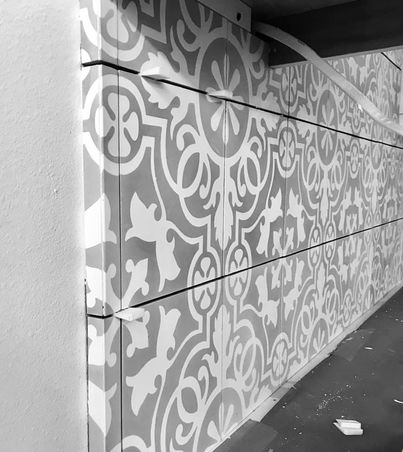
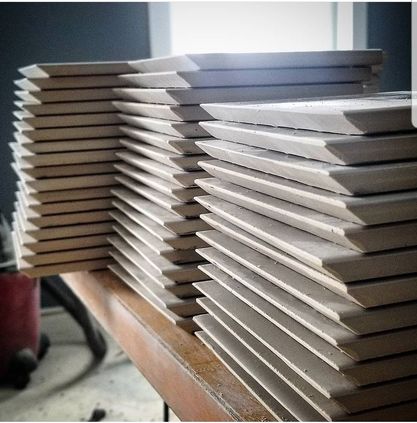
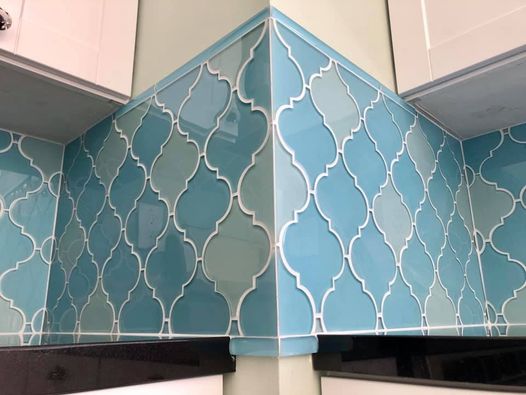
Mitering: a hallmark of a tile installation and a craftsperson’s skill. The tighter the miter, the greater the skill, the finer the installation.
But is a tight miter what the end user really needs? Is it good for the life of the installation? Is it even safe?
We all know the NTCA Reference Manual is a rich resource of technical tile information that is constantly being updated. The NTCA and members of its Technical Committee care deeply about their fellow tile contractors and the success and safety of our industry. The 2020/2021 edition of the NTCA Reference Manual includes a new section (pages 172 – 173) dedicated to performance and safety precautions when mitering tile and stone. NTCA Five-Star Contractor Woody Sanders of D.W. Sanders Tile & Stone Contracting in Marietta, Ga., knows the concerns and challenges with mitering and led a committee to craft this newly-published section. I recently had the opportunity to spend some quality time with Woody talking mitering and the process of crafting this section for the NTCA Reference Manual.
I don’t need to re-hash for you everything the NTCA Reference Manual says about mitering. It’s a heck of a lot better if you just crack open your copy to pages 172 – 173 and read the new section for yourself.
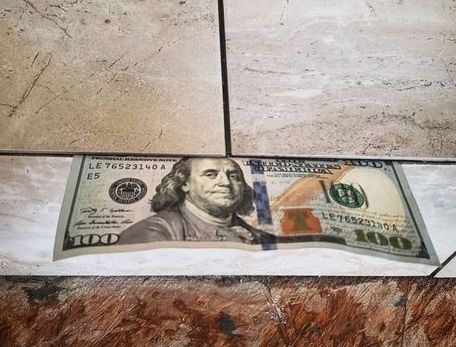
I do want to discuss the fact that tight miters are not necessarily the right miters. Woody and I see lots of examples of amazing tile craft skills illustrated by photos that show tight inside and outside miters, sometimes where $100 bills are used to show the nice tight joint width. Super nice. But always appropriate? Here are some excerpts from my conversation with Woody.
Mark: Why did we need a section about mitering in the NTCA Reference Manual?
Woody: There are many reasons, primarily: aesthetics; safety; proper installation practices; structural stability; long-term performance of the installation. In a wet area especially, safety is paramount.
Mark: One of the hallmarks of a modern tiled shower is that it is a one-of-a-kind, hand-crafted appliance. That means there are usually lots of niches, benches, short walls, alcoves – you name it. All of these are prime locations for miters, making showers the place where an installer can really showcase their skill.
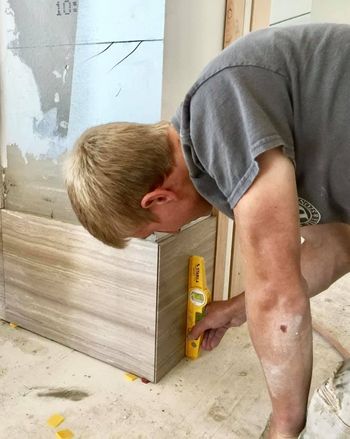
Woody: That’s right. A shower is the place where a gifted installer and smart contractor can make good money. The problem comes when aesthetic considerations become safety hazards. Sharp, tight miters may look great for the photo-op but every installation must be created with full consideration for the end use and end user. Here’s the problem – a shower is one of the highest slip/fall hazard locations there is. Slip and hit your head on a sharp corner or three-way miter and you might not have a good medical outcome.
Here’s the other problem – Modern buildings are designed to move. Walls move, floors move, the individual layers of a tile installation move independently of each other. When this movement occurs and there is no room at the miter joint to allow for that movement action, the tile will break, the bond will break – something will break. When it breaks, it will not look as pretty as it once did. In a wet area, the break will open access for water to enter. When water enters the system it can become an agent of destruction.
As tile contractors and installers, when we build a shower, we are creating a one-of-a-kind, hand-built plumbing fixture. We need to understand that we have to manage ALL of the water that enters the shower and direct it to the drain/waste/vent system. Bond coat coverage is very important in a wet area. It is not easy to get 95% or better bond coat coverage when trying to create a really tight miter joint. If bond coat coverage is sacrificed to create the joint, an opening for water to pool and weaken the system is created. That beautiful joint will not look so pretty with use and time.
Mark: Have you actually seen personal injuries caused by sharp miter joints?
Woody: Yes, I have. Lacerations and cuts. I wanted to use the word laceration in the NTCA Reference Manual, but my committee had to talk me down. Think about it this way – How many tile installers do you know that don’t have cuts on their hands?
Mark: How long did it take to get this section published?
Woody: About a year. It was introduced to the committee of the whole at TISE 2019 where consensus was made to place it on the agenda; a first draft was written and presented at Total Solutions Plus 2019 where a subcommittee was formed to re-shape the draft; the second draft was presented to the committee of the whole at TISE 2020 and was accepted for publication in Chapter 6 – Specialized Installation Procedures.
Mark: Who was on the committee?
Woody:
Nyle Wadford of Neuse Tile helped with navigating the Technical Committee process and made sure the written words make sense on the page.
Chuck Muehlbauer of the Natural Stone Institute helped with the background of the quirk miter as coming from stone industry.
Mike Hawthorne of the IUBAC made certain we stayed true to ANSI standards.
Noah Chitty and Derek Patterson of Crossville provided input from the tile manufacturer’s perspective.
Jim Harrington of Schluter kept the committee informed on alternatives to mitering.
Mark Albonetti of MD Pro / Prova contributed his wide experience with miters and trim units.
Joseph Mattice of On The Level provided input from an installation contractor’s perspective.
Mark: How wide should a miter joint be?
Woody: The width of the miter joint should match the width of the grout joint in the tile field. If it does not, the aesthetic of the installation becomes unbalanced. Grout joints exist for good reason in all tile installations. They serve as buffers or transitions from tile to tile in the field. We need this buffer of space from tile to tile at the miters also.
Mark: Is there ever a correct time to create a super tight miter joint?
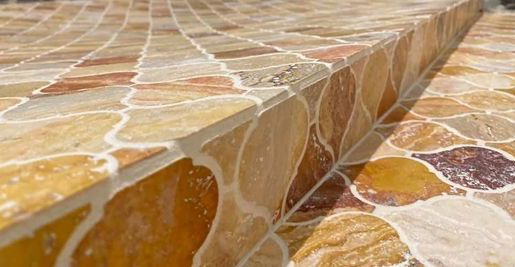
Woody: There sure is. We do a lot of work with large stone and panels. We create waterfall edges that are color match epoxy filled, cured and hand softened to create a very pleasing, structurally sound and safe miter joint.
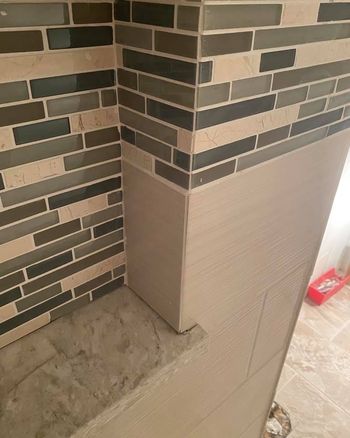
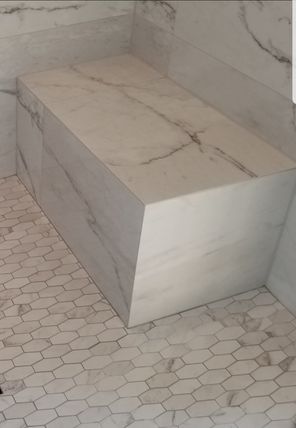
Mark: The NTCA Reference Manual, page 172, talks about quirk miters. These form an external corner with beveled, blunted noses to avoid the sharp edges of the common miter. Tell us about those.
Woody: Quirk miters are a great way to make a long-lasting, aesthetically-pleasing miter that is safe for users and makes for an enduring installation. The quirk miter concept comes from the stone slab industry. Stone workers understand the strengths and limitations of their materials and they know how to make their miters safe for use and for long-lasting performance. Tile installers should use quirk miters as an excellent alternative to sharp miters.
Mark: Are there any other alternatives to sharp miters?
Woody: Yes. Bullnose and custom-made – even made on site – bullnose are great options. Tile with matching trim pieces are another great way, but they are not as prevalent or available today as they once were. A number of manufacturers also make a wide variety of metal or plastic trim that is set into the bond coat along with the tile. The NTCA Reference Manual discusses modern trim strips as an option. Some modern installations look terrific with the modern trim elements. In many traditional architectural designs clean termination points are critical.
Mark: I have used all of those methods. Each of them takes a lot of skill and experience and time to make for a great looking installation.
Woody: That’s right. Hand polishing, bullnosing, or measuring, cutting and fitting metal trim strips and corners are skills all by themselves. I know some contractors and installers doing beautiful work with these refined skill sets.
Mark: We’ve been talking about mitering for hours. How would you summarize our conversation?
Woody: A mark of craftsmanship is a clean termination point. Look for matching trim. Look to use fused miters. Blunt the miter or use a quirk miter. Don’t miter in wet area. Miter as the last resort.
Mark: Thank you, Woody Sanders, for all you do.
If you know Woody Sanders like I do, you know you can’t have a conversation without discussing the benefits of being a member of our professional association. We talked about the direct access to the resources of our profession and true networking with the people that makes our industry tick. Woody says it so well: “You get more than you give when you get involved.” And he’s got the stories to prove it.
If you are looking to get more out of your membership, contact me to get involved at [email protected].

Mark Heinlein
Mark Heinlein, CTI#1112, is the former Training Director for the National Tile Contractors Association (2015-2024) and a former Ceramic Tile Education Foundation evaluator for the Certified Tile Installer program. Heinlein owned Mark Heinlein Surfaces of Negaunee, Michigan prior to working with NTCA.


