


A trio of bath projects shows precision and excellence of NTCA installers
This month, we bring you three stunning shower projects from NTCA members in Indiana, North Carolina and New Jersey. Note the color scheme – a recent Houzz study reported that white still reigns supreme in bathrooms, and these projects prove the point.
Each tile contractor wrestled with unique challenges on the job, and applied creative solutions to create well-performing, beautiful results for their clients.
Compton Tile: residential steam shower
Beau Compton, owner of Compton Tile, Elkhart, Ind., was hired by a satisfied homeowner for their new home after a remodeling project Compton Tile did for this client a year before.
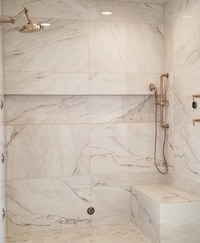
The residential steam shower was designed using 24”x48” porcelain tile. All finished edges were mitered and wrapped when possible, and Compton Tile installed a tileable drain grate. The contractor traditionally uses Schluter, but the plumber had used a 3” waste line and Schluter didn’t carry a 3” bonding flange at the time. Compton switched to a LATICRETE bonding flange with tileable grate.
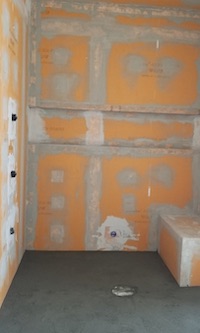
“We packed the pan above the bonding flange and used a Noble Seal deep drain flashing to accommodate LATICRETE’s tileable drain, and make it work,” Compton said. Walls and ceiling are KERDI BOARD and tile installed with Schluter ALL-SET mortar.
Mitering was done with care, using a grinder and variable speed polishing pad to ease all edges, Compton said. “It was very tedious but the end result came out great.” Compton also applied 100% silicone to all changes of plane and miters.
Another surprise is that the homeowner and general contractor didn’t know they needed a sloped ceiling with steam showers. “We had to cut and taper wood strips along the ceiling to create a slope,” Compton said. “It wasn’t 1/4” per foot because the homeowner didn’t want a bulkhead in the ceiling, but we met halfway with their expectations. I think they will have plenty of room in this steam shower for many years to come.”
Compton said, “The GC used another company for years. After completing this custom steam shower, we have been working with the GC on multiple projects.”
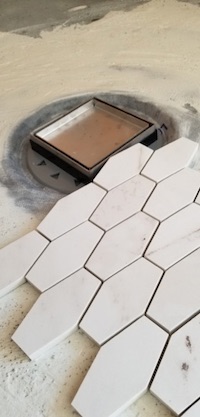
Compton used a LATICRETE bonding flange with tileable grate. 
Walls and ceiling are KERDI BOARD and tile installed with Schluter ALL-SET mortar. Mitering was done with care, using a grinder and variable speed polishing pad to ease all edges. The homeowner and general contractor didn’t know they needed a sloped ceiling with steam showers. As a result of this project, Compton Tile is now working with this GC on multiple jobs.
Tile Innovations: basic to beautiful in two weeks
“This master bathroom was completely overhauled from top to bottom, going from basic builder grade to custom in less than two weeks!” said Tile Innovations Owner/Operator Michael Miller, of Raleigh, N.C.
Miller said of the recently-completed project, “As with any project there are always going to be parts that I am not satisfied with. But overall I am really pleased with the way this particular one came out.”
Miller’s challenge was trying to balance the pattern while encountering several obstacles that affected how his cuts fell – including non-movable objects. He tried to minimize smaller cuts as much as possible, employing several lasers that he used to project beams in multiple directions horizontally and vertically at the same time. This allowed him to slowly adjust everything, from where the niche would be to the Finnish fixtures to account for windows and other objects so he could balance the pattern in the absolute best way possible.
Compounding the difficulty of the layout of this room was the size of the original tub that was ordered, but the wrong size showed up, forcing Miller to slightly change the size of the shower.
The final project received the following:
- Fresh wall paint.
- Premium vinyl plank flooring.
- Raised double vanity with glass vessel bowls.
- 67” freestanding tub.
- Tiled wainscoting in tub surround area.
- Chrome fixtures and finishes throughout.
- High-efficiency dual flush toilet.
- Custom 16-sq.-ft. enlarged two-walled shower stall, featuring:
- Glass tile accents.
- Carrara marble curb top.
- Glass panel doorless entry.
- Complete KERDI system by Schluter.
- Professional-grade stain-resistant grout.
- A 12”x28” niche with Carrara marble shelves.
- Rain head shower fixture with separate wand.
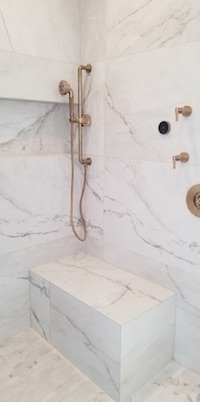
The tub that arrived differed in size from that which what ordered, so Miller had to slightly change the size of the shower. The final shower featured a Carrara marble top curb.
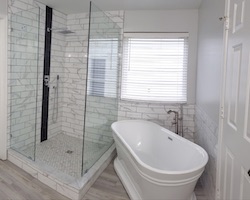
The shower enclosure had a glass panel doorless entry. The shower included glass accents, Carrara marble niche shelves and a rain head fixture with wand.

Modern Room Remodels: large panel shower install
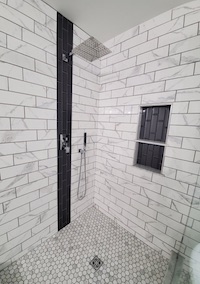
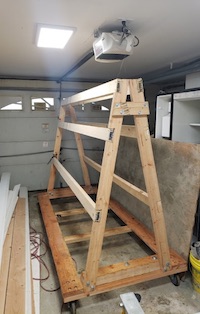
Joe Macaluso of Modern Room Remodels in East Hanover, N.J. just completed a slab installation in a residential shower. The big challenge was placing panels safely in the home and numerically positioning them due to veining match. Macaluso built a custom portable rolling A-frame that can be broken down when not in use for storage and easily brought into homes.
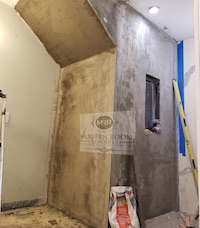
Macaluso said that the first consideration is that walls must be flat. His company achieved this by using MAPEI Planitop Fast 330 to render the walls flat to meet ANSI requirement for flatness 1/8” per 10’. The next step was cutting the panels to size. “It’s always ideal to cut closest to the install room to eliminate accidents,” Macaluso said. “Fortunately this was a new home, and we cut [panels] in the second floor master bedroom and used a HEPA vacuum system to minimize dust when cutting.”
To more easily maneuver the 9’ panels, Modern Room Remodels built a pulley system attached to a handling system that electronically lowered the panels into position very gently – and effortlessly – eliminating accidents.
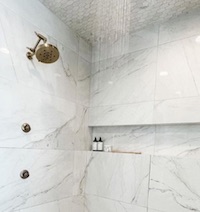
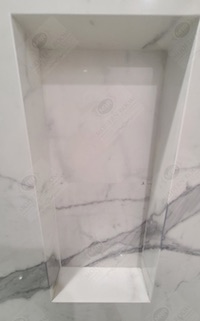
Macaluso said that most breakages occur when cutting niches, so to avoid breakage while handling, he makes it a rule to never pre-cut niches. Instead, he recommends, “Install slab in full, cut to size, then place template on top of installed slab. Slab will be cut while on wall the next day.” Then miter match veining into the niche, he said, using an electroplated double-sided diamond saw that allows you to maneuver in the limited space and perform the task efficiently and chip free.
Matching the veining is also extremely challenging, Macaluso said. “The front portion that was originally cut out gets reused then placed to the backside of niche. Then using remnants from cuts from other slabs, we were able to reinvent the veining wrapped from the side to back and around. Very cumbersome and artisan work!”
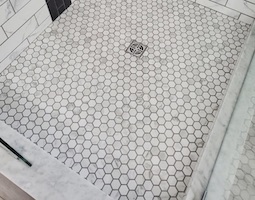
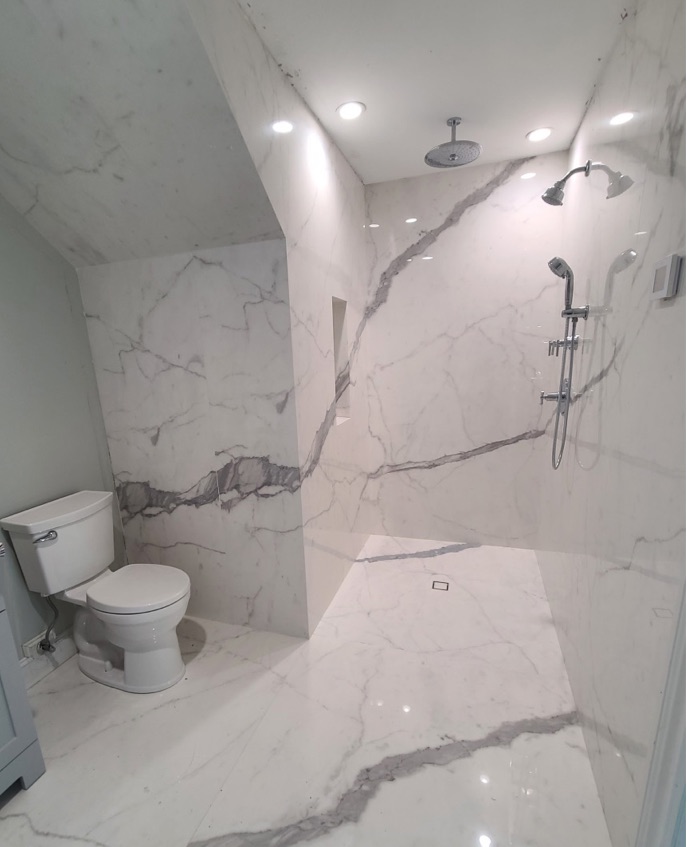
Modern Room Remodeling then installed a large-format single slab matte shower floor envelope. “Unfortunately we waste a half of a slab but it’s soo worth it,” Macaluso said. “We template the pan ahead of time, then [create] envelope cuts for the cumbersome floor with a cherry on top – a wedi tileable drain.”
Macaluso emphasized that he only installs a matte finish (not polished) porcelain that is appropriate and approved for shower floors per anti-slip value. “We will never install polished finish on shower floors,” he said. If a customer requests it (due to veining match) then Modern Room Remodel offers a custom program to get it cut to
2”x2” or 4”x4” size. “This particular client wanted the large format, so we opted for the right anti-slip coefficient to make it work,” he said. He also recommends a special surface treatment that provides a higher anti-slip clear film on the surface if they want some extra traction.
After the installation, Modern Room Remodels cleaned the slabs, using a low pH cleaning stone product, which removes all mortar marks and dirt off the slab and makes it “sooo shiny.”
View the process of working with slabs in a bath application here: https://bit.ly/3aog0aR
Macaluso built a custom portable rolling A-frame that can be broken down when not in use for storage and easily brought into homes. Modern Room Remodels used MAPEI Planitop Fast 330 to render the walls flat to meet ANSI requirement for flatness 1/8” per 10’.
Matching the vein in the niche is an exacting process. Matching the veining is artisan work. The floor received a matte finish slab that has the right DCOF for shower flooring.

Lesley Goddin has been writing and journaling since her first diary at age 11. Her journey has taken her through a career in publishing and publicity, landing her the editor position of TileLetter and its special publications in 2006. Her goal is to educate, inspire, recognize and encourage those in the tile industry -- especially the tile and stone contractor.


