Question
It appears to my untrained eye that most 12”x24” tile is laid so that each abuts the two adjacent tiles by 50% each. However, the sales associate said some governing body (Tile Layer’s Association??) had rules against that because of “lippage?” Are there rules on how tile should be laid? If so, where is the resource for that? I’d like to know, as being the homeowner, I assume I’m ultimately responsible for catching mistakes in the construction of my new home.
Also, is it better to purchase (at high cost) precut 4”x12” or is it acceptable to have those cut by installers from 12”x24”. A sales associate said the former is the better option.
Answer
These are excellent questions that are answered by the tile industry’s written standards and best practices.
It sounds like you are selecting tile for a builder’s installer or tile contractor to install. I suggest asking your builder if their installer or contractor owns and applies the methods and standards in the Tile Council of North America Handbook for Ceramic, Glass and Stone Installation (TCNA Handbook), and the American National Standard Specifications for the Installation of Ceramic Tile. These are the documents that answer your questions.
The associate you are working with is giving you solid advice based on these standards. The retailer you are working with is a strong supporter of NTCA and their staff and associates, many of which have attended our training programs, are knowledgeable about these things.
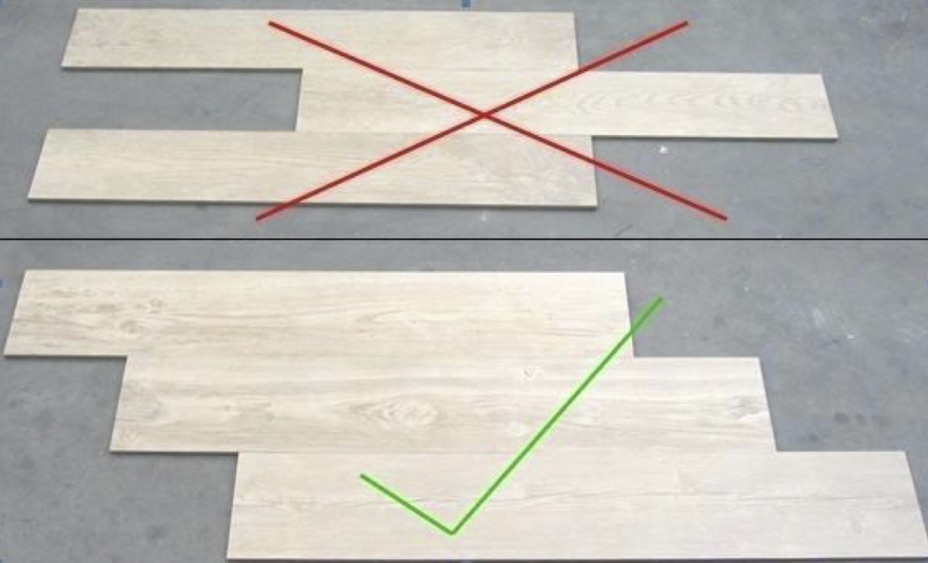
50% offset for 12”x24” tile
ANSI A108.02 section 4.3.8.2 is where the answer is. I will paraphrase what it says – When tiles with sides longer than 15” are being set with their long sides next to each other they shall be set in a pattern with an offset of 33% or less. If an offset more than 33% is desired (such as a 50% offset), the specifier and owner must approve a mock-up and agree to the lippage that may result from this type of pattern being installed.
The reason for this is that some tiles have what is called warpage as part of their manufacturing process. Warpage is when the tile is bowed in the middle. The ends of these tiles may be lower than the middle of the tile. When tiles longer than 15” are set next to each other in a 50% offset, this puts the high part of the middle of one tile directly opposite of the low part of the end of the adjacent tile. This can result in a difference in height elevation of the plane between the two tiles. This difference in the plane is known as lippage. To quote the TCNA Handbook: “Lippage is a condition where one edge of a tile is higher than an adjacent tile, giving the finished surface an uneven appearance. Lippage is inherent in all ceramic installation methods and may also be unavoidable due to the tile tolerances, in accordance with ANSI A137.1.”
Not all tiles have warpage. There are industry standards that describe acceptable warpage. Some tiles are made to meet those standards, some are not. The tile manufacturer can tell you if their tile meets the standard for warpage. It is in ANSI A137.1.
Some manufacturers will have specific offset requirements for their tiles. They may require a 20% or 25% maximum offset.
So – if you would like a 50% offset, you need to ask your tile contractor to lay them out or physically install a few so you can view them as they will look in the finished installation. At that time you would approve and accept (in writing) any lippage that occurs as a result of setting them at a 50% offset. You will own and live with this installation – it is your decision to approve or reject the mockup.
Cutting 4” x 12” tiles out of 12” x 24” tiles:
The TCNA Handbook for Ceramic, Glass and Stone Tile Installation states: “Tiles should not be field-cut to size to accomplish modular patterns or to align grout joints, as field-cut edges will be dissimilar from factory edges and cannot be held to the same squareness tolerance.”
This is not a desired practice. In reality, it is not less expensive as your tile contractor should rightly be expected to charge labor and materials to cut down and smooth or hone the tiles. The tile contractor likely has excellent tools, but they may not be of the same grade as the tile factory and with human error, there may be variations from tile to tile after they are cut. Expect the labor price to increase, as more time is needed to ensure all tiles are well matched and finished.
Depending on the tile body and glaze, this practice may present opportunity for chipped tiles. A large amount of additional tile may need to be purchased at the outset to account for this possibility.
To ensure that you get all of the correct technical information you need for your installation, I strongly encourage you to employ an NTCA member contractor and a CTEF Certified Tile Installer (CTI). These contractors and installers own, understand and apply the tile industry’s recognized standards, methods, best practices and follow manufacturer instructions in the installations they construct. NTCA Members and CTEF CTIs have direct unlimited access to the NTCA/CTEF technical team for training and detailed industry standards-based support in every installation they construct.
Please review the Ceramic Tile Education Foundation’s homeowner’s guide to hiring a qualified installer and visit the NTCA site to find an NTCA member contractor in your area.


