


Coming to an NTCA Reference Manual near you, soon!
One of the most exciting recent developments in the artisan tile installation movement has been the acceptance of artisan-related content in the 2022 NTCA Reference Manual, which will be published later this year.
At the NTCA Technical Committee Meeting that took place January 31, 2022, immediately prior to The International Surfaces Event (TISE) in Las Vegas, Nevada, the committee approved the addition of a new chapter – Chapter 6 – dedicated to artisan tile installation, as well as a new document that addresses pre-mounting of hand-shaped mosaics. The chapter and new document were originally proposed to the NTCA Technical Committee during the meeting that took place on October 23 at Total Solutions Plus (TSP) in Jacksonville, Fla., and a committee assembled to finalize the document for the January 31 meeting.

Lee Callewaert of Dragonfly Tile and Stone Works in Grafton, Wis., Joshua Nordstrom of Tierra Tile in Homer, Ak., and Angie Ré of Unique Mosaics LLC in South Salt Lake, Utah presented three techniques for pre-mounting hand-shaped mosaics for durability, ease of transportation and to speed and facilitate the installation of finished works. Dragonfly’s Jane Callewaert devised the Power Point and supported the presentation. The techniques included:
- The Fabric Sheet Membrane technique, presented by Callewaert
- The Mesh/Liquid Membrane technique, presented by Nordstrom
- The Foam/Cement Backer technique, presented by Ré
You can read the digital article about the October 23 presentation at https://bit.ly/3HqjtTc

The complete “Pre-Mounting Mosaics” document will be included in the NTCA Reference Manual. But following is an overview of the techniques and steps that can be implemented for mosaics of any sort – a major art piece or even a more traditional installation that includes separate decorative elements. These techniques are essential for the advance preparation of a tile assembly that can be transported to the jobsite and installed more quickly and efficiently as a single, semi-rigid durable piece of tile. They are also a way to manage tiles of different thicknesses, and minimize surface lippage.
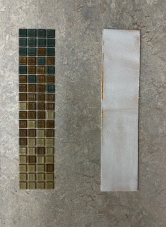
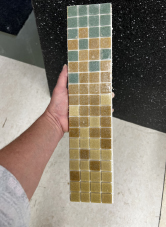
An important fact about these methods is that they are also applicable to factory-made mosaics. The document states, “Pre-mounting mosaic borders, for instance, will result in a more precise installation with less mess, less effort to clean joints, a flatter surface, and easier material management. This is particularly helpful when mosaic borders are thinner than the field tile.”
Following are the three techniques and steps to achieve them. See Chapter 6 in the upcoming NTCA Reference Manual for complete information, supporting photos and charts, as well as transportation recommendations.
Method 1
Fabric Sheet Membranes
Recommended for materials closer in thickness to the field
- Lay out clean, dry tile pieces like they are going to be installed and use a mosaic mounting tape on the face of the tiles to secure them in place.
- If a mosaic is larger than 3′ x 3′, cut the mosaic into manageable, divided sections that can be labeled and flipped over.
- Cut the fabric membrane (ANSI A118.10) into pieces, larger than the individual sections to be mounted.
- Scratch coat the fabric membrane with a lightweight, polymer-fortified thin-set mortar approved for use with the intended specific tile materials (glass, ceramic, porcelain, stone meeting ANSI A118.15, A118.4, A118.11).
- Use a V-notch to trowel the alkali-resistant fabric (trowel size can vary based on desired thickness).
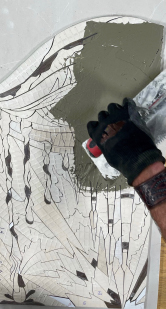
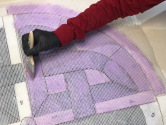
- Flat back-trowel the mosaic piece with thin-set mortar to ensure a flat plane and compensate for any differences in material thicknesses.
- Lay your mosaic section on the fabric membrane and using a large, flat, and rigid tool (large enough to cover the tile), such as a beating block or a large-format tile, apply steady pressure on the mosaic piece to achieve a proper bond (can also be accomplished with a vibration tool).
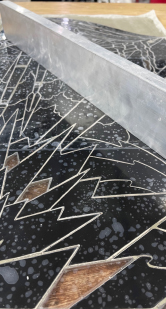
- Inspect the joints at the side of the mosaic panel. When a proper bond is achieved, thin-set mortar will be visible in the joint at a nominal 1/3 thickness of tile.
- With a level, check your piece for flatness. If more compression is necessary, replace the compression block previously used and use a compression tile tool. Clean excess mortar from perimeter of mosaic panel.
- Allow to cure for appropriate period based on adhesive mortar used (24-48 hours). Remove the face tape and clean any thin-set mortar from the joints. Trim excess membrane from perimeter of mosaic panel.
- Clean tile surface and apply new mosaic face tape (face tape shall be removed after installation and prior to grouting).

Flat back-trowel the mosaic piece with thin-set mortar. Lay your mosaic section on the fabric membrane and using a large, flat, rigid tool apply steady pressure on the mosaic piece to achieve a proper bond. With a level, check your piece for flatness.
METHOD 2
Mesh with Liquid Waterproofing Membrane
Recommended for varying thicknesses of materials used in mosaic
- Apply a suitable primer, approved by the liquid membrane manufacturer, to the backs of clean and dry tiles and allow to dry per manufacturer instructions.
- Lay out the pieces as they will be installed and place mosaic mounting tape over face of tile.
- Cut into manageable sections that can be labeled and flipped over.
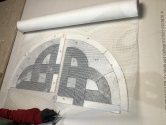
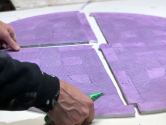
- Lay an alkali-resistant fiberglass mesh over the backs of the tiles.
- Apply an even coat of an ANSI A118.10 liquid waterproofing membrane with a brush (taking care not to allow excess in grout joints) and let dry. Apply a second coat and let dry completely per manufacturer specifications, usually 24 hours.
- Cut through mesh into manageable pieces.
- Trim excess liquid waterproofing membrane and fiberglass mesh from tile edges.
- Flip sections over, remove mosaic mounting tape, clean grout joints, and reapply mosaic face tape.
Lay an alkali-resistant fiberglass mesh over the backs of the tiles. Apply an even coat of an ANSI A118.10 liquid waterproofing membrane with a brush (taking care not to allow excess in grout joints) and let dry. Cut through mesh to form manageable pieces.
Method 3
Foam or Cementitious Backer Board
Recommended when additional thickness is required for installation
- Cut foam or cementitious backer board to actual size of mosaic inlay (mosaic not to exceed size of backer board).
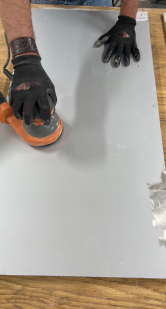
- Place board onto a flat, horizontal surface, such as a worktable, and skim-coat board
with thin-set mortar (allow to cure per manufacturer instructions). - Sand down rough or high spots, trowel thin-set mortar over backer board, then install mosaics. Clean perimeter of excess mortar.
- Refer to ANSI Installation Specifications A108.14, A108.15, A108.16 for installation of mosaics onto backer board.
- Clean joints. Allow 48 hours for thin-set mortar to cure before handling. Grout if desired.
- After the inlay has fully cured, if needed, cover the face with a mosaic mounting tape for additional protection during transportation and final installation of inlay.
Note: Before moving inlay, slide a piece of plywood or comparable material underneath inlay using straps and/or appropriate packing measures around all sides to stabilize inlay during transportation to jobsite.
Cut foam or cementitious backer board to actual size of mosaic inlay (mosaic not to exceed size of backer board. Place board onto a flat, horizontal surface, such as a worktable, and skim-coat board with thin-set mortar (allow to cure per manufacturer instructions). After the inlay has fully cured, if needed, cover the face with a mosaic mounting tape for additional protection during transportation and final installation of inlay.

For all methods
- It is recommended to produce a mock-up to ensure a proper mortar bond.
- If glass tile is used, validate proper bond (ANSI A 137.2) per manufacturer specifications.
- After installation, create soft joint at perimeter of mosaic inlay as instructed by membrane manufacturer (ANSI A108.17) or, in the case of glass tile mosaics, refer to ANSI A108.16.
James Woelfel, NTCA Technical Committee Chairperson, addressed the Committee in October, saying, “There has been an explosion in artisan work. It is important we put this in the NTCA Reference Manual to protect good work and educate people going forward to give them a lot of information so we don’t ruin something that is exploding into tile and stone. We want to be on the front end of getting younger people involved, and trying to guide them in the right direction.”
“This is a major step forward as our industry embraces the importance of artisanship in tile,” said Dragonfly’s Jane Callewaert, a member of the artisan team.

Lesley Goddin has been writing and journaling since her first diary at age 11. Her journey has taken her through a career in publishing and publicity, landing her the editor position of TileLetter and its special publications in 2006. Her goal is to educate, inspire, recognize and encourage those in the tile industry -- especially the tile and stone contractor.


