


–sponsored content–
A question often asked is, “Are all cement boards waterproof?” They’re not. Some are as of very recently, but most are water-resistant. So the next logical question becomes: what is the difference between something that is waterproof and water-resistant? Let’s get into it.
By pure definition, a waterproof product means there is a permanent moisture barrier. Nothing passes through, so there’s no deterioration. A water-resistant product means the material can resist the penetration of moisture up to a certain limit, whether that is exposure time, or pressure applied by the water.
This may have you wondering, “How can I make my water-resistant tile backer waterproof? Is that even possible?” The answer is absolutely.
To truly waterproof anything, you need to think of your installation as a system, and that system is only going to be as strong as its weakest link. A waterproof system can be easily achieved with the addition of a waterproofing membrane. Sheet-style waterproofing membranes are applied like wallpaper but leave behind seams that can be prone to water intrusion. Many prefer liquid applied membranes; they roll on like paint to form a single monolithic sheet. Liquid waterproofing membranes are considered “cheap insurance” to protect from mold and mildew at a very low per-square-foot cost.
4 steps to truly waterproof a shower
This one’s for the perfectionists, so let’s focus on just a shower to make this a bit more specific, but the gist will stay the same across different installations. The waterproofing process outlined here is geared at covering your reputation for years to come, but remember, codes are different everywhere and each product comes with a separate manufacturer’s recommendation, so don’t forget to check those as well. But enough of the small talk, let’s get into it.
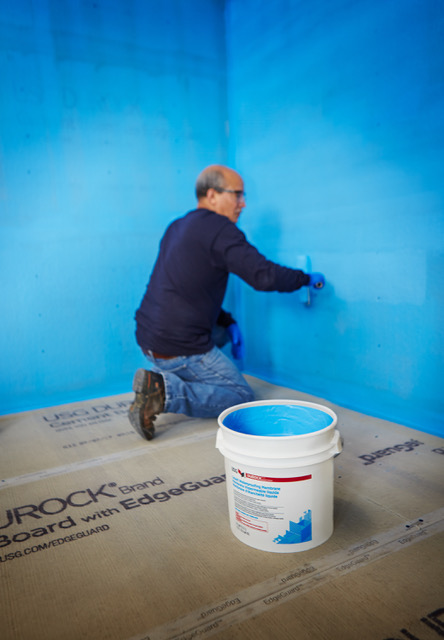
Step 1: First hang your cement tile backer. Get the good stuff that’ll score and snap, because it’ll save you from sawing outside or hauling around a HEPA filter. This is why many prefer USG Durock® Brand Cement Board with EdgeGuard™. The ease of cutting, and proprietary edge performance against crumbling and spinouts, makes all the difference. Additionally, your fasteners should be coated to resist corrosion (such as hot-dipped galvanized) or made out of stainless steel, such as USG Durock™ Brand Tile Backer Screws.
Step 2: Mud or seal your joints with Type 1 organic adhesive or latex-modified thin-set mortar. That’ll probably get you up to code, but we don’t stop there. We like a bead of sealant in the corners, which sets in 15 minutes.
Step 3: This next suggested step is what will make a shower last even longer: a waterproofing membrane. Like mentioned previously, many prefer liquid membranes because they’re so easy to use. One great option is USG Durock™ Brand Liquid Waterproofing and Crack Isolation Membrane because it requires just 1-2 coats** (15-20 mils wet per coat, measured using a wet film thickness gauge) and also offers crack-isolation properties for added protection. The membrane should be applied on the interior side, which will be exposed to moisture and is going to ensure moisture will not be coming into contact with your cement board or other materials.
Step 4: Lay your tile in full confidence that you’ve done everything to prevent mold.
You might be wondering, “Is this something I have to do every single time I lay tile?” The answer to that is no; it depends on the environment in which your tile is going to be applied. Basically, if it is meant to get wet, it gets waterproofed to protect your craftsmanship from mold, mildew, and rot. The usual suspects are places like bathtub surrounds, showers, mud rooms, laundry rooms, indoor pools, hot tubs, and places of the sort.
Questions? Call USG. Seriously.
There are variables on every project, so you have to consider your environment, the local codes, manufacturer’s recommendation, and how all your materials will combine to create a waterproof system that meets your demands. So if you ever have any questions about this sort of thing, contact James Brady or any USG rep.
** = Many applications require just 1-2 coats, but some require more. See installation instructions for specific coat and mil thickness requirements for your application.


