


QUESTION
We are working to price a really big job and we have a number of questions about the project to make sure we are covering all of our bases.
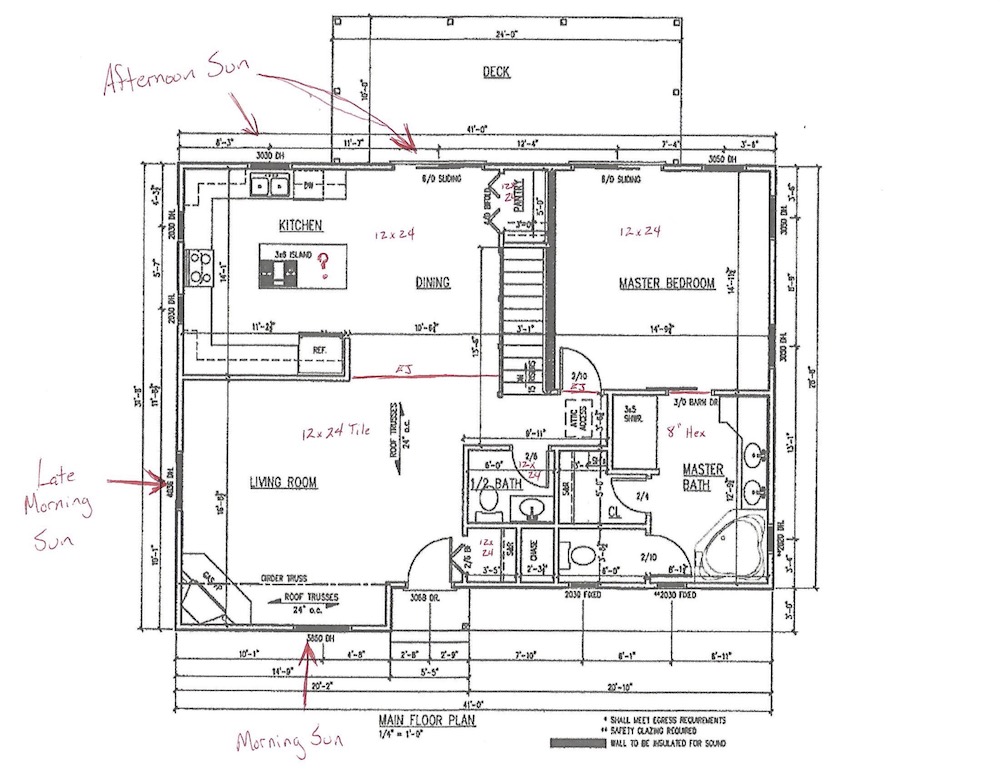
In the attached drawing, we have made a number of notations. This entire floor of this house gets tile – about 1,100 sq. ft.!
Kitchen, living room, half bath, pantry, and master bedroom all get the same continuous tile.
- Subfloor is 3/4″ Advantech over 9.5″ wood I joist, 16″ o.c.
- 1/8″ LATICRETE Strata Mat will go on top of that
- 12″ x 24″ tile in all of those areas
- Master Bath area all gets 8″ hex tile
- Same subfloor and substrate as above
We are planning on putting an expansion joint between the dining and living area, probably from the corner near the refrigerator and the stairs and in the doorway of the master bedroom.
There is a part of me that wants to add one from the front door to the sliding door in the kitchen or at least to the point where the expansion joint between the dining and living room is located. These tiles will be on a 1/3 offset, so that will make for an interesting expansion joint. This house is set in a resort on a mountain, trees all around, so the sun entering the windows is not very intense, but with the large area of tile, the expansion joints are needed, I believe.
The other question area is the kitchen island. I am not certain what the countertop will be at this moment; that is a question that will be asked, but I do have concerns for the weight in that area.
- All the tile will be set in place before any cabinets, so there are 6-7 lbs. of dead weight per sq. ft.
- The island is sitting in the middle of a 12′ span for the floor joists
- I’m concerned about the ability of the joists to hold the dead weight as well as any live load that may be added if this family was to host events that involved people gathering around the island. This is something to ask the contractor and have him ensure we are good there.
Last question: I understand the process of gridding the floor to find our cuts on such a large area of tile. Is there a way to grid this when the tile are on the 1/3 offset? I can see making a larger layout and marking certain ones, but I am hoping that I do not have to snap lines for every row of tile.
ANSWER
For the layout, please see the pictures below and let me know if you have questions. It is how my company has done countless larger floor projects with offset patterns in and out of rooms and around many different types of obstructions. The measurements will depend on your tile and spacing and would not be noted on the floor – only the chalk lines and arrows – and provide a reasonable number of guidelines to stay on track without going overboard. Once you draw arrows to each line of the first two or three rows, you can just draw it to the bottommost rightmost corner (in these examples and depending on direction of the layout) for reference and be in a rhythm installing to stay on track.

One third stair-step One third running bond
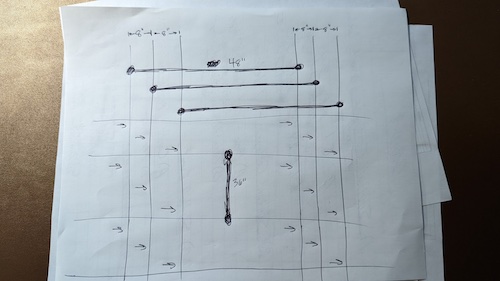

When going around obstructions, repeat that process to remind yourself of the pattern in case the new orientation of the room is deceiving. We can discuss line-popping and measuring techniques separately, if need be, to ensure the accuracy of the physical layout.
You should consider planning to re-square and utilize “Dutchmen” or strategically-cut field tiles, if necessary, to make the adjoining sections mesh well with the previous ones. For example, when you approach the area with the attic access beyond the stairs, you may discover you need to find a way to transfer the general layout from the dining to the master bedroom and prevent having a small cut down any of the long walls in the master bedroom. In that vestibule under the attic access, you could “cheat” tiles that cannot be seen in conjunction with both rooms at the same time to make the master bedroom layout more desirable. Many times, this is shaving a few quarter or half inches off several tiles to shift the layout to better work in the next area, or readjusting under the door with strategic cuts that can be imperceptible and also allow for movement joints.
In regard to your question about EJ171, depending on the risk you feel comfortable exposing your company to, you may want to prune as much unnecessary responsibility from the job you can. We can follow the generalized rules for EJ171, but I recommended you require the general contractor (GC) seek help from a structural engineer (SE) to guide the layout of movement joints. There is only so much we, as the tile contractor, can know about structures moving around and their ability to support dead load and intended live load, or the maximum possible live load such as family gathered around that island or especially anything exotic. Usually, this can be remedied by a frank, yet kindly concerned conversation with the GC and client. Reasonable people will see the value in your words.
SEs can help in two ways if they are willing to look at EJ171 and give you a general recommendation OR a stamped, signed, sealed, and delivered report. The cost for the client could be a few hundred dollars for a general recommendation and the report could be several thousand dollars depending on the extent the SE must go to get the most accurate information. The more expensive option allows for the GC to shed liability off their shoulders. Either way gets you a documented instructional that alleviates risk from failed tile because of excessive movement if you execute everything else correctly.

Brad Denny
Brad Denny CTI #1190 has been intensely active in the tile industry for many years. He has served as Region 6 Director for the National Tile Contractors Association (NTCA), received the NTCA Dedication to Membership award – a recognition specially created just to honor his passion for methods, standards, and the internet – and chaired the NTCA’s Social Media Subcommittee as well as moderated the Tile Geeks Facebook group.
Brad also served as the Co-Chairman of the NTCA Training and Education Committee with Sam Bruce of Visalia Tile for 2020 and 2021.
In 2021, Brad received the prestigious NTCA Tile Person of the Year Award. This award is given to someone who has positively impacted NTCA through participation in the Association's programs.
Before becoming Executive Director for CTEF, Brad was vice president and COO of Nichols Tile & Terrazzo Co, Inc., a family-owned tile contractor business located outside of Nashville, Tenn., and NTCA Five-Star Contractor Member of the NTCA.


