


Critical lighting, wash wall lighting, grazed lighting, pose a major make-or-break dilemma for the tile subcontractor if not addressed correctly. As the last trade in, improper installation of lighting and tile can have huge ramifications on the finished design and accepted install.
When asked to write this article on critical lighting and how it can make or break the success of your installation I was posed with three important questions.
Before I get into the responses to these questions, let’s first define critical lighting and the issues that it presents to the tile installer. The phenomenon of critical light occurs when sunlight or another source of light strikes a wall surface at a 15º angle or less. At this angle, any irregularity in a wall surface 1/32” or greater can cast a shadow. This causes the imperfections of the installation to be highlighted and will most certainly cause an installation failure and the architect and GM to reject your install. In addition to the Flatness and Lippage section of the TCNA Handbook, the NTCA Reference Manual has excellent information on critical lighting situations and lighting placement on the appearance of lippage in wall tile installations.
What does a tile contractor need to know about lighting and how it affects the perception of lippage?
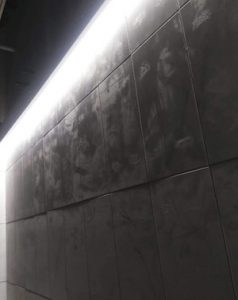
Architects and designers utilize overhead lighting to enhance the tile on a wall surface or provide needed lighting for the interior space. Think – if you will – of a restroom wall surface where lighting is required to illuminate an area above a sink. Most lighting is installed directly overhead or up against the wall. Per TCNA standards, we recommend lighting be placed at a distance of 2’-0” off the wall to limit the dramatic effect of wall grazing.
Make sure that this factor is addressed early. An RFI to the general contractor (GC) and architect sent prior to construction can address any changes that need to be made to position correct lighting in the space. If addressed early in the planning phase, it prevents the need for correction and scrambling on the job site when the tile contractor is called in to work on finish details.
After the lighting position is correctly determined, the tile contractor needs to ensure that the substrate is flat. This is the first step in avoiding undesired lippage. In order to achieve substrate flatness, the installer needs to have a rate of 1/4” for every 10’ of wall surface space from the required plane according to ANSI A108.02. The use of a 10’ straight edge will greatly assist the tile contractor in determining that flatness of the substrate. High or low spots on the wall will need to be corrected by the GC and drywall company or the tile contractor to ensure overall flatness prior to installing tile. Additionally, it is important that the tile contractor is aware of the following key elements prior to setting that first piece of tile:
- • What is allowable thickness and variations of the tile modules?
- • What is the allowable warpage of the tile module?
- • Recommended spacing or separation of each tile module?
- • What is the angle of natural or manufactured light?
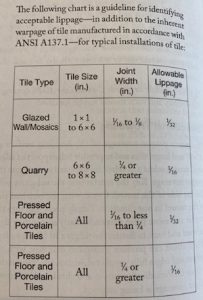
Refer to ANSI A137.1 for a chart that outlines acceptable lippage per tile type and tile size. The tile manufacturer can also assist in clarifying the first three items listed above. Reach out to your manufacturer representative for assistance. Once all these things are addressed the tile subcontractor is ready to install tile per TCNA standards.
What are the biggest mistakes contractors make, and how do they impact the job?
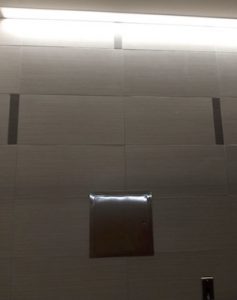
Often, as mentioned above, tile contractors do not correctly review plans prior to getting on the jobsite for their install. They then have to assess the situation on site and bring the issue of grazed lighting concerns to the GC and architect. The suggestion and use of a mock-up will alleviate many issues and bring possible imperfections to the attention of the architect and GC, providing a tangible visual of what the effects of wash lighting will do. At this point the tile contractor might suggest that the GC and architect call electricians back in and move the lighting, or sign off on the install knowing that it will limit the tile contractor’s ability and cause an undesired lighting effect.
When proceeding without addressing the lighting position with the GC and architect, the tile contractor might be in a situation where the install is rejected, and will have to tear out and re-install the job, making adjustments on the fly. Essentially the tile contractor will be starting from scratch, causing unnecessary delays, frustration and unwanted financial costs on the job.
What tips can you share with contractors to be sure that they work with A&D professionals and general managers to harmonize lighting to the tile installation?
- Be proactive – Communication and understanding of industry requirements and standards are the first line of defense for the tile contractor when it comes to critical lighting. Prior to installation, review plans, ask questions of the architect and GC and reach out to NTCA professionals for recommendations and industry experience.
- Protect yourself – Have the architect and GC inspect the mock-up and secure written approval prior to proceeding. The NTCA is here to assist members; we even offer templates in the way of a drafted a sample letter for the tile contractor to submit on critical lighting (consult the NTCA Reference Manual, page 130).
To summarize, I recommend a simple three part pre-planning strategy for successful tile contractor that will alleviate grazed wall issues:
- Review: plans, jobsite, installation design.
- Mock-up: although it adds time on the job site, this will alleviate any surprises down the road for all parties involved when the lights get turned on.
- Sign-off and approval: Architect, GC, projects engineer, owner’s rep.
Happy setting and know that as a member of the NTCA, you are part of an elite group of professional tile contractors who are educated, skilled and the leaders in the industry who get the job done right the first time!


