


Tierra Tile’s Joshua Nordstrom walks us through the process of templating a mosaic
In the NTCA Roundtable Live! Artisan Edition that took place back in January, master artisan tile installer and NTCA member Joshua Nordstrom of Tierra Tile in Homer, Alaska, offered a detailed description of how he creates templates for his mosaic tile projects. In this article, we’ll touch on the highlights of Nordstrom’s process and explore his techniques for templating your work.
Why is a template a key part of your project? First, it’s a necessary process to determine the size, shape and number of the pieces of tile, stone or glass you will use to make the design you are installing. NTCA member Joshua Nordstrom of Tierra Tile in Homer, Alaska, also said bringing a life-size template to the client – marked with shapes and colors – allows the client to visualize what the design or pattern will look like once installed, and to make any last minute changes before moving on to the final templating and cutting the material. “It gives them peace of mind, and helps me to see they have clarity,” he said. “I find it really helps when you can draw it and color it for them to give them an idea.”
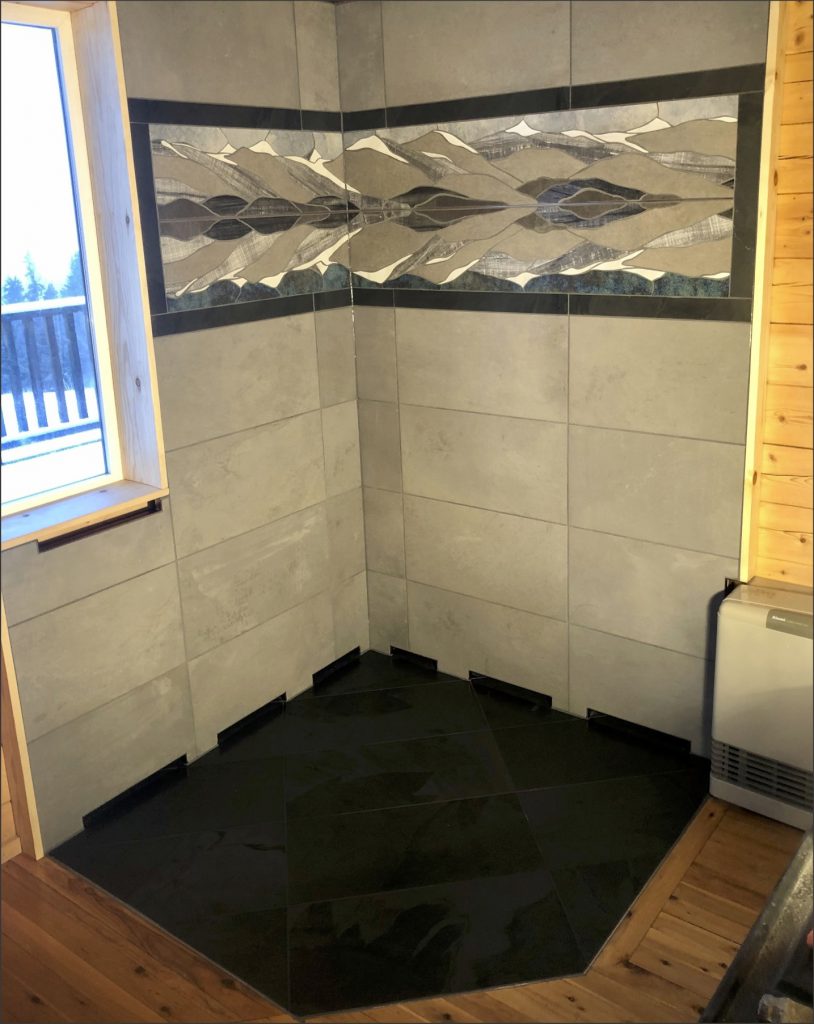
A reflective scene
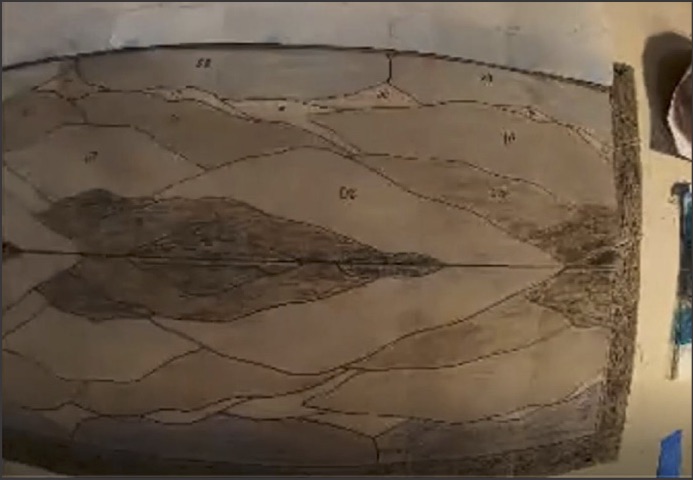
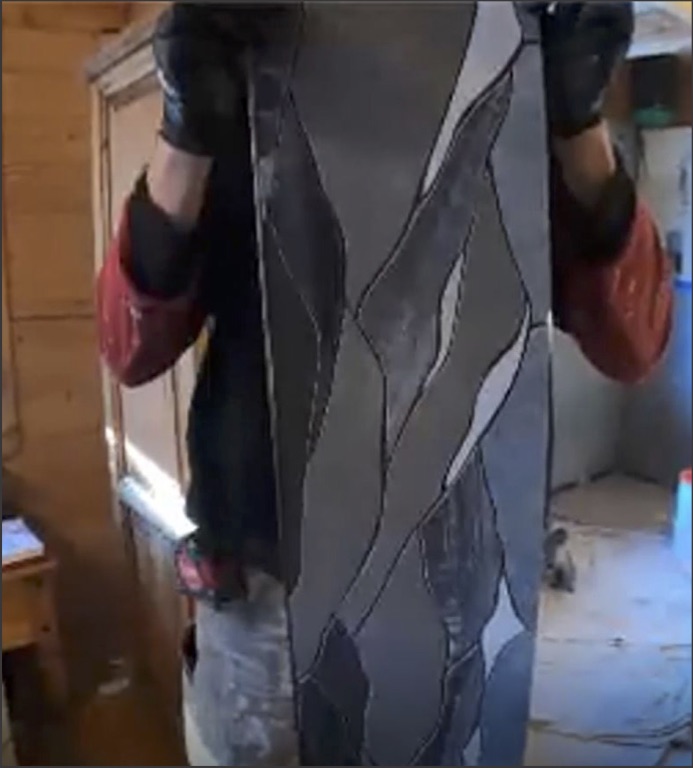
Nordstrom used his project of a reflection scene of Kachemak Bay for a neighbor’s fireplace surround as an example of the process. The tranquil, reflective scene of the bay and mountains was planned for porcelain, with a slate border. Nordstrom measured out the size the finished project would need to be, then drew the top portion life-size on construction paper. He noted that another option is to create a smaller drawing to scale on graph paper and enlarge it to size using an overhead projector. Either way, Nordstrom prefers to work with his drawings on a wall rather than working on the ground on his knees, unless the scale of the template is so large that working on the ground is the only way to manage the project.
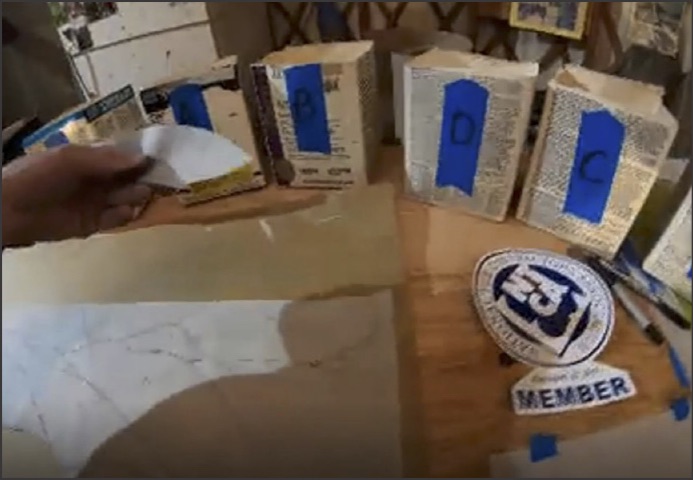
Next Nordstrom labeled his mosaic sections on his original drawing with the colors of tile he planned to use. He coded it to be A, B, C, D, for the mountain shapes, S for the sky (and water in the reflection) and I for the ice.
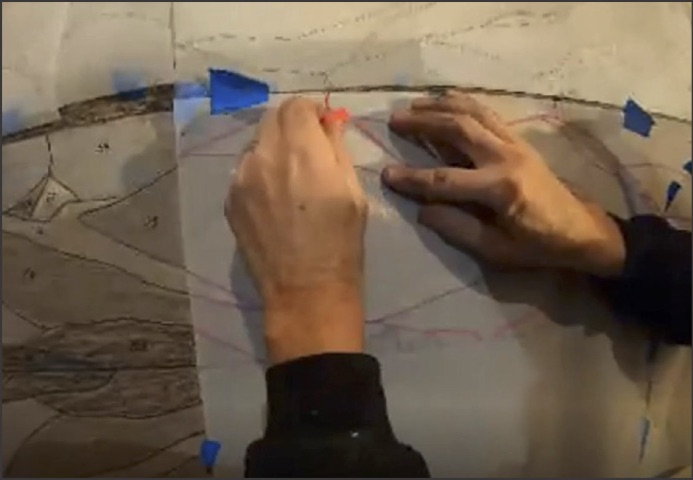
Making a mirror image
To create the reflection in the water, he taped tracing paper over the drawn image of the top section of mountain and sky and traced it with artist’s soft pastels. Then he flipped that paper down and drew over the pastel line with a pencil to transfer the image to the paper below. Another option to transfer the line is to use carbon paper. Not every project will call for this, but he demonstrated these two ways to create a mirror image reflection. When this step was complete, he brought this life-size, colored template to the client. (See video 005 to see how Nordstrom creates a mirror image.)
Once approved, the template for cutting pieces of tile begins. At this stage he said, “You can control and choose how big your grout lines are. People nowadays want to keep lines as small as possible, but you have some artistic freedom with mosaics.” He recommended grout lines from 1/16″ to not more than 1/8″; some areas may be thicker or thinner depending on what you are trying to achieve. He also advised ensuring that the templates will fit on the materials you choose. “If not, you will have to compensate and add a grout line or two.”
Creating the tile cutting templates
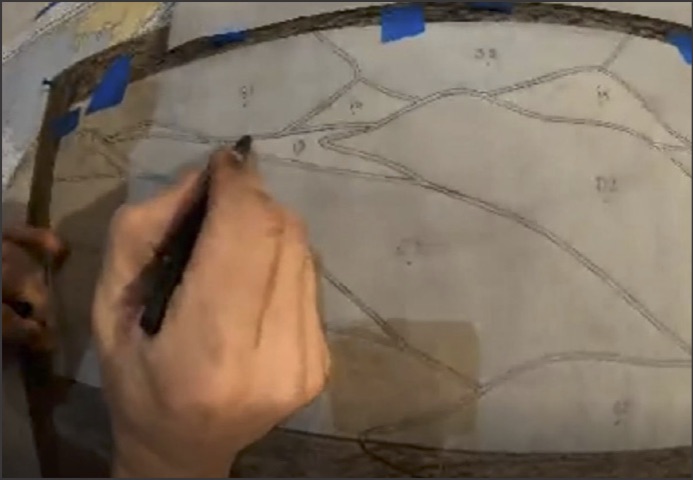
Using large 18″x24″ tracing sheets, Nordstrom folded tracing paper down over the design and traced both sides of the line with a fine tip Sharpie®, allowing him to control his grout line. At this stage he also transfers the letter/number code to tracing paper so he can keep track of the tile location (mountain, sky, ice) and the number of pieces. Nordstrom prefers vellum tracing paper sheets to tracing paper on a roll, explaining that he has found the vellum sturdier and the roll trace more prone to ripping. (See video 3 to see how Nordstrom uses multiple pieces of tracing paper to transfer his lines and complete the template for the tile pieces he needs to cut.)
Using the original letter/number codes for tile sections and colors, Nordstrom placed a dot beneath the letter/number marking on the top side of the image and a line beneath the reflection image. That way he “knows what side is up and I’m not reading it upside down,” he said. “If I have two S38s, and one has a line and one has a dot, I know one is the top and one is the reflection.”
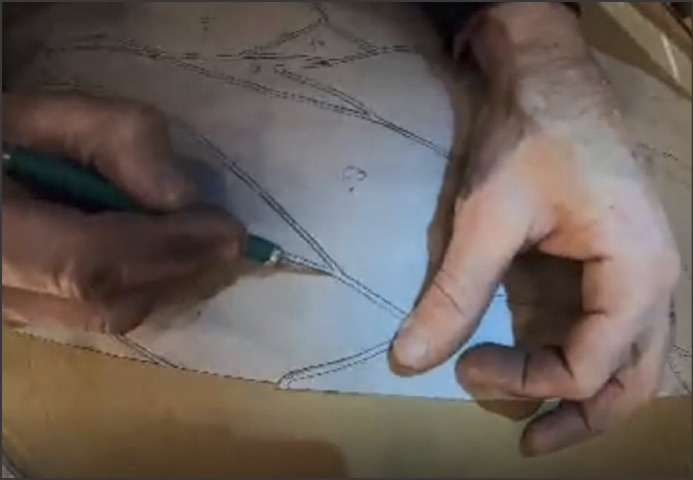
Next, Nordstrom prepared to cut the template, being sure to use an X-Acto knife with a brand new blade. He used the back side of a drywall sheet as an excellent cutting board.
“Trace your line and cut it out,” he said. “Stay true to the line you have on your tracing paper. If you need to adjust your grout line, this is where you have to do it.”
Again, he recommended putting the dot or line on the piece to help keep track of top and bottom pieces. “You don’t want to trace the piece upside down and cut a piece of tile upside down,” he said. Once the pieces are cut out and labeled, he placed them in old grout boxes he has labeled: A, B, C, D, for the mountains, S for sky/water and I for ice.
Cutting tile pieces
Nordstrom advised using striations or textures in the tile or stone for what you want to achieve. In this pattern, he used a wood-grain tile to enhance the design and show striations in the mountains. “Slate and travertine have really cool textures that you can use to your advantage,” he said. “You might have a 12″x24″ piece of tile and want to cut a tiny piece out since it may have a blemish which works perfectly for what you want to do.”
When selecting materials, he emphasized knowing the limitations of the tile or stone you are working with, and what it will allow you to do. Inspect the back side of the tile for a vein, since this weakened area can cause the material to fall apart. You may need to cut a different part of the stone or choose a different material. “Read your material and design according to your material,” he said. “If you make a huge template and you’re trying to put it on a 4″x4″ tile, it’s not going to work.” Another tip is taking advantage of the factory line of the tile if you have a straight bottom for your piece.
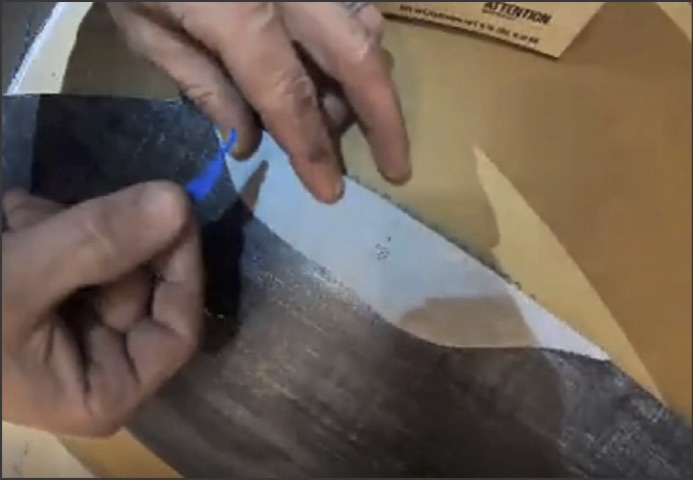
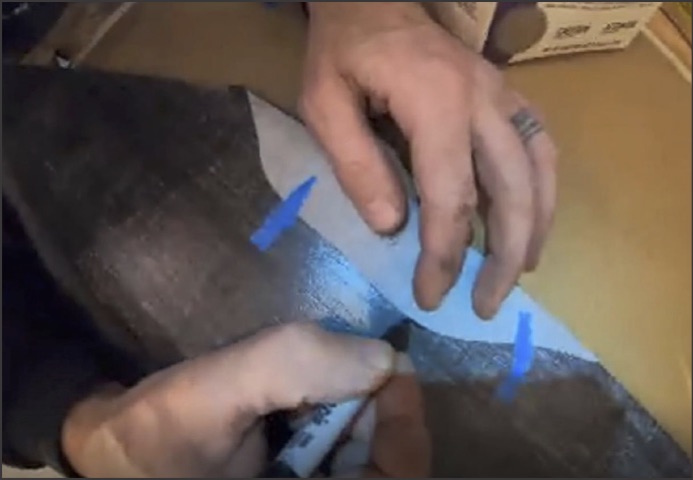
When he starts cutting out his tile pieces, Nordstrom has a veritable bracelet of thin pieces of blue tape on his sleeve he can quickly grab and use to hold the paper template piece onto the tile piece he wants to draw the shape on. Once the paper template was taped to the tile, he traced the shape directly on the tile with a Sharpie. He positioned multiple template pieces of the same color on the tile to utilize as much of it as possible, while also being sure he can make a straight cut into the piece with the saw. When he removed the tape, he drew a Sharpie line to connect the blank spaces on the tile was covered by tape. He also flipped the tile piece over and marked it with the letter/number code before it is cut. He clarified which side of the line he will cut by marking the “waste” side of the line with xs.
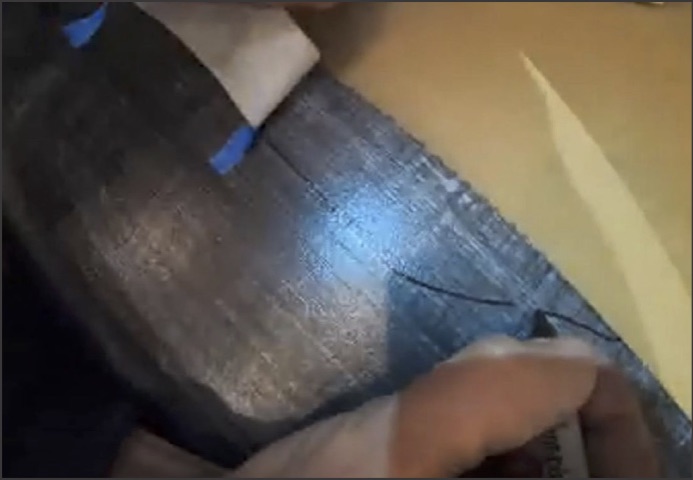
To be sure your fingers or the water from the wet saw does not wash away your template line while cutting, Nordstrom suggested protecting it with tape. He explained that for the blue tile in this piece, he needed to go over it with 2″ blue tape and draw the black Sharpie template line on that, then protect that line with clear mosaic tape.
At this point, Nordstrom started cutting tile pieces. He is a huge fan of his wet saw and cuts 95% of his work using it, since he finds it easier to manipulate the blade. “A ring saw is great, but it’s a little more finicky,” he said. “Using a ring vs. a solid blade – you have to be more gentle with it.” Whichever saw you use, Nordstrom said, “You will want to make the line disappear when you cut it.”
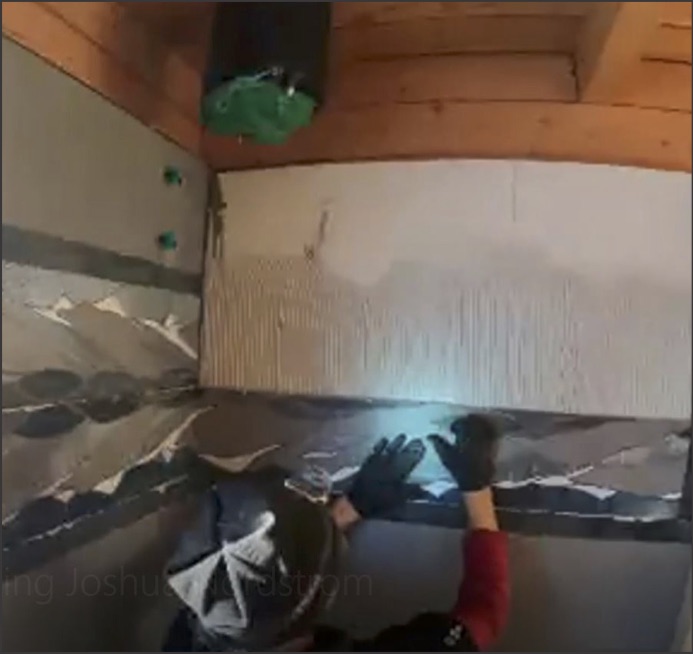
One final recommendation after cutting all the pieces, is to premount the mosaic. This is a “huge time saver” on the job, he said. In the early days, he used to install every little piece of the mosaic at the site, but now he said, “I build it all in my shop and then we take it and do the install in a matter of a couple of hours.”

Lesley Goddin has been writing and journaling since her first diary at age 11. Her journey has taken her through a career in publishing and publicity, landing her the editor position of TileLetter and its special publications in 2006. Her goal is to educate, inspire, recognize and encourage those in the tile industry -- especially the tile and stone contractor.


