


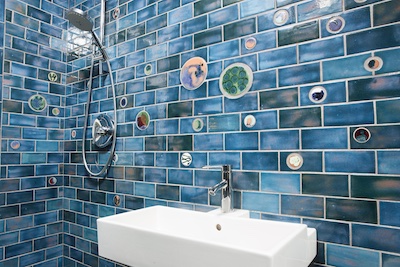
Handmade tiles trace their origin back to approximately 3,000 B.C. in ancient Mesopotamia where tile bricks, fired at high temperatures, were used to protect exterior surfaces from the weather. Fast-forward to the handmade tile of today and we see tiles that are unique – no two tiles are the same. These tiles come in a variety of shapes and sizes that many times also vary in thickness.
The beauty and uniqueness of a handmade tile installation provides a one-of-a-kind image. However, to satisfy the desires of the consumer, all persons involved in the project including the consumer, architect, designer, general contractor, tile supplier/manufacturer, and the tile installer should participate in each step of the process. It is critical that both the consumer and the tile installer are well educated prior to installation so that realistic expectations may be satisfied.
It is for that reason that an NTCA Technical Committee subcommittee of 12, including Chairwoman Jan Hohn, spent 30 months creating the “Handmade Tile Installation” document for the 2023-2024 NTCA Reference Manual. Pages 240-241 contain excellent information that is crucial for all involved to know and understand during the very early stages of a handmade tile installation.
Hohn said, “I felt there was a real need to inform tile installers who have never installed handmade tile, or those who did and had issues.”
This article will touch on several critical points made in this document.


Tile selection questions
Because handmade tiles are unique and may not meet any of the ANSI 137.1 standards, these questions need to be addressed before installation:
- Is the handmade tile an appropriate choice for the intended project?
- Can the tile be used in an interior and/or exterior installation?
- Is the tile recommended by the manufacturer for use on a floor, wall, conventional shower, or stream shower?
- Is the tile recommended for pools, fountains, or other water features?
- Is the tile appropriate for use in freezing temperatures?
The answers to these and other questions must be obtained “in writing” from the handmade tile manufacturer. The statement by any other person such as, “I think that will work” is not adequate, and should be disregarded. The tile installer should be given written instructions that list any limitations or cautions, the need for a grout release or sealer and how many coats are required, soaking the tile prior to installation, detailed instructions on the cutting method, the recommended mortar/adhesive, trowel type and size, type and color of the grout, and any other information needed for a successful job.
Grout joint size

Since handmade tiles are crafted one at a time, each one can differ from the next, which creates real challenges for the tile installer. One difficulty encountered is a wide variation in size and as such, many handmade tiles do not meet the American National Standards Institute (ANSI) requirements. However, using ANSI A108.02-4.3.8 grout joint size can be of great assistance. This standard states, “To accommodate the range in facial dimensions of the tile supplied for a specific project, the actual grout joint size may, of necessity, vary from the grout joint specified. The actual grout joint size shall be at least three times the actual variation of facial dimensions of the tile supplied. Nominal centerline of all joints shall be straight with due allowances for hand-molded or rustic tiles. In no circumstance shall the grout joint be less than 1/16″.”
Mockups are a must
In order to provide the consumer and the designer with realistic expectations, it is crucial that they “see” how the job will appear when completed. A mockup can be provided as a dry lay on a very flat substrate, showing the range of tile color, glaze characteristics, pattern, and appropriate grout joint size. But the dry lay mockup may fall short of the visual needed.
An installed mockup on a piece of backer board will show the above listed items plus the tile-to-tile lippage and the grout joint size. Often, the joint size will need to be increased to accommodate the tile size variation. When some tiles are butted tightly together with no grout joint and others have a very wide joint, the result is a crooked appearance which will be unacceptable. For instance, if the tile varies in size by a full 1/8″, it may be best to apply the ANSI three times the tile size difference formula. 1/8″ times three would equal a 3/8″ grout joint. The consumer and/or the designer may not be happy with this recommendation, but it most likely is the best option since it allows the installer to provide an acceptable tile alignment.
Once the consumer(s), designer, and any other pertinent parties agree that the mockup is acceptable, have each of them sign and date the back of the board. The installer should keep the signed board in hand until the project is successfully completed to eliminate the potential of selective amnesia by the folks involved.
Tips and techniques to assist in an acceptable installation
This is an abbreviated list. See the 2023-2024 NTCA Reference Manual pages 240-241 for complete information.
- Applying grout release or the recommended sealer will aid in removing grout during wipe down. Pay close attention to tiles with deep relief, textures, fissures, and crazing.
- Combine tiles from three to five boxes to assure a pleasing blend. Get the consumer and/or designer involved in this process.
- Sort out tiles with obvious defects or imperfections and set them aside for possible cuts.
- Installing handmade tiles will take more time, so bid the job accordingly.
- Consider using a mortar with extended open time and the possibility of applying a membrane on the substrate to slow down the moisture absorption by the tile, yielding more time to make alignment adjustments.
- Have a good supply of various sized wedges or shims to aid in joint alignment.
- Consider using string or rope of different thicknesses on walls to accommodate size variations.
- Handmade tile installations will require more waste allowance than conventional tile installations. Order enough tile initially. Additional tile may not be available in the same dye lot or may have extended lead times.
If these recommendations are followed, all involved parties will be satisfied, and failure and disappointment won’t be part of the conversation. n
All images courtesy of Sarah Whiting Photography, Clay Squared to Infinity, and Hohn & Hohn, Inc.

Scott Carothers
Scott Carothers is the Acdemic Director for the Ceramic Tile Education Foundation (CTEF) and is responsible for the creation of the Certified Tile Installer (CTI) program, and is involved in the creation of the Advanced Certifications for Tile Installers (ACT) program as well as providing training to others in the tile industry.
Carothers has been involved in the ceramic tile industry for nearly 40 years and was the owner of a successful retail and installation firm prior to CTEF. He has served as President and Chairman of the Board of the National Tile Contractors Association (NTCA), Chairman of the NTCA Technical Committee, was named the NTCA Tile Person of the Year in 2005, and the NTCA Ring of Honor recipient in 2013. He is a voting member of the ANSI and the TCNA Handbook committees.


