


Quick and easy ways to achieve them correctly
Hopefully, as a tile installer, you’ve heard a lot about movement, expansion, or movement accommodation joints – and regularly plan them into all of your installations. Unfortunately, too many people who regularly install tile are not aware of their importance. We’re going to explore why they are absolutely necessary – and how to provide them correctly, quickly, and easily.
The National Tile Contractors Association (NTCA) Reference Manual glossary, provides this definition of an expansion joint (aka movement joint): “A joint through the tile, mortar, and reinforcing wire down to the substrate.”
By integrating these “stress relievers” into the tile assembly, expansion and contraction takes place without compromising its integrity. But who is responsible to make this happen?
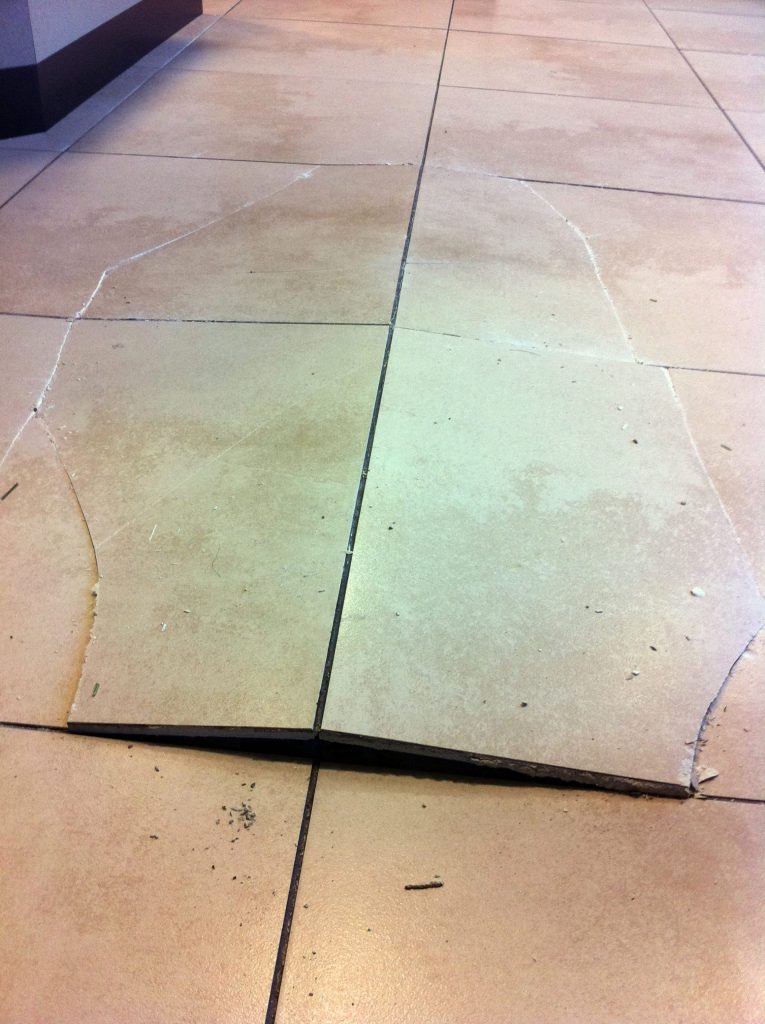
Sadly, movement joints are probably the least-used, most-misunderstood, and often-eliminated part of a tile installation. However, they are one of the most important listings in the Tile Council of North America (TCNA) Handbook under Method EJ171. Without movement joints, failure is lurking in the shadows, waiting to strike. This is true especially on floors with ceramic, porcelain, glass, and natural stone tile that is subject to sunlight, in-floor heat, and/or moisture. Many installations that appear to be well done, will fail. The lack of movement joints gives the tile assembly no room to expand, causing the tile to pop up or “tent,” most times in the middle of the floor. You must allow for this movement in all residential and commercial projects. Movement joints are not optional – they are required.
What the TCNA Handbook says about movement joints
The 2020 edition of the TCNA Handbook EJ171 Movement Joint Guidelines for Ceramic, Glass and Stone clearly states: “The design professional or engineer shall show the specific locations and details of movement joints on project drawings.”
Regrettably, many people involved in the installation of tile products don’t understand that installed tile moves. If this expected movement is not accommodated, the tile will become rebellious and most likely will become very expensive for the responsible person or company.
In other words, as a tile installer, it is wise to include movement joints on every project. Again however, it is not the installer’s responsibility to design and/or locate these joints. That is to be done by the design professional or engineer.
The attached TCNA Handbook EJ171 detail shows the necessary components of the movement joint:
- Width that is four times the expected movement
- Compressible back-up
- Rounded back-up with no bond to the sealant
- The depth of the sealant is one half of the width of the joint
I call your attention to the sealant. Notice that the sealant is attached only on the sides of the two adjacent tiles.
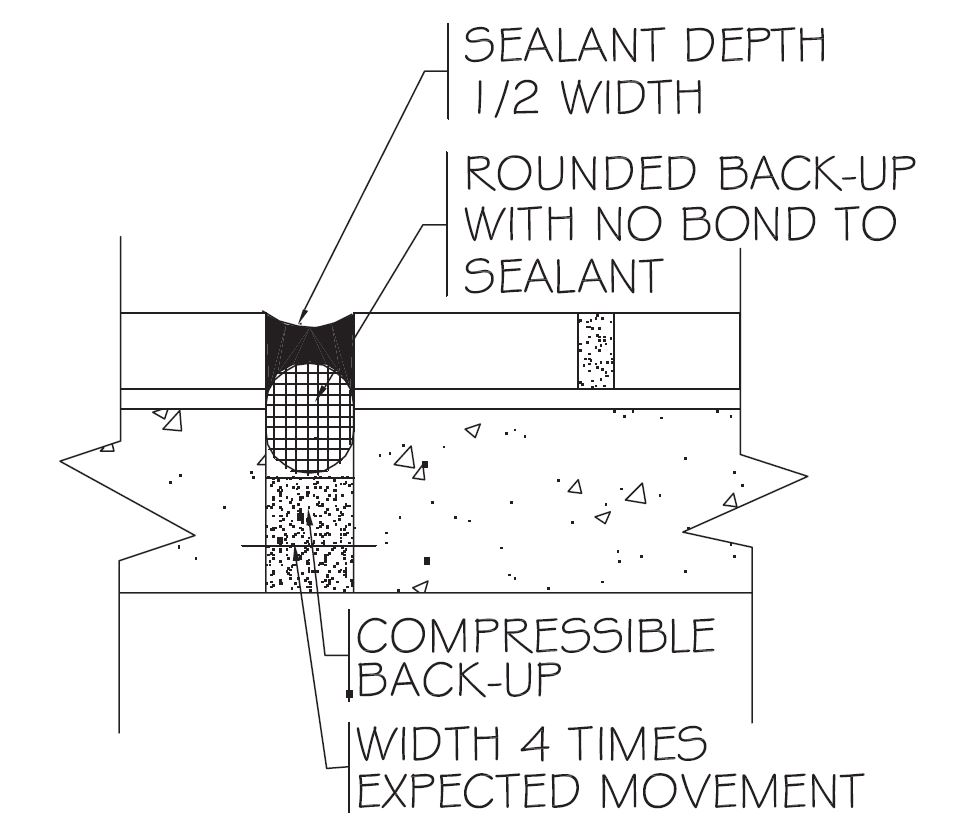
One critical point here is that the sealant does not contact or bond to the sides and/or bottom of the joint. If the sealant is allowed to do so, it is locked in place and will have zero movement ability. In this case, the insertion of a “Rounded Back-Up,” or closed-cell polyethylene foam backer rod allows the concrete floor to expand and contract, but its primary role is to keep the sealant where it belongs: attached only to the tile edges.
You will notice that the detail refers to the joint material as sealant. This is done purposely to differentiate it from lesser-quality caulking products (acrylic latex or siliconized latex), which dry hard and do not allow for continuous flexibility. According to the requirements of EJ171 and ANSI A108.01, this sealant must be 100% silicone, urethane or polysulfide.
If you understand these principles and install the joint properly, it will permit the required movement to take place, keeping the tile flat on the floor where it belongs. Certified Tile Installers understand this and can properly install movement accommodation joints.
Quick and easy methods for installing movement joints
Do you think movement joints are complicated or are messy to install? Actually, they aren’t. Here are two methods that will produce excellent results, easily and quickly.
Method #1 for movement joints:
Install the appropriate-sized foam backer rod into the joint
- Apply painter’s tape along the tile edges of the joint
- Fill the joint with 100% silicone
- Smooth it with a sealant tool, popsicle stick, or plastic spoon
- Remove the tape by pulling it on an angle toward the joint as soon as the sealant is in place.
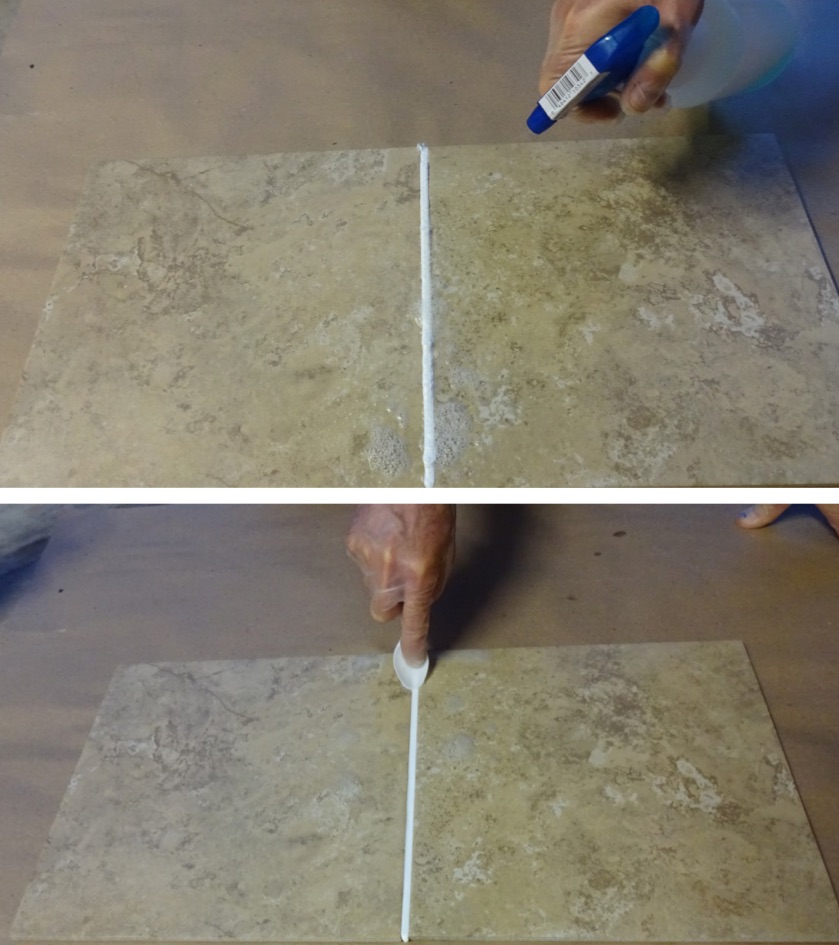
Method #2 for movement joints:
- Insert the appropriate foam backer rod into the joint
- Fill the joint with 100% silicone sealant (no need for tape)
- Spray the sealant and the face of the tile with a mixture of water and dish detergent.
The sealant tool, popsicle stick, or plastic spoon is also sprayed with dish detergent solution, allowing the excess sealant to be easily removed without the worry of it sticking to or smearing on the face of the tile. This technique is something that Certified Tile Installers have to successfully complete during their hands-on test.
When should the sealant be applied?
ANSI A108.02 – 4.4.5 states, “Install sealant after tilework and grout are dry. Follow sealant manufacturer’s recommendations.”
As I conduct demonstrations on the proper installation of sealant joints, I often hear this statement, “It can’t be that easy.” It is really that easy. Using this technique will save time, eliminate costly callbacks, make your installers happy, and yield satisfied customers. Sometimes something so simple can provide huge rewards.
––––––
The Ceramic Tile Education Foundation (CTEF) provides education and installer certification for professionals working in the ceramic tile and stone industry. Certification programs include the CTEF Certified Tile Installer (CTI) program, that is the only third-party assessment of installer skill and knowledge to be recognized by the tile industry, and the Advanced Certifications for Tile Installers (ACT). CTEF is headquartered in Pendleton, S.C., near Clemson University and the TCNA offices. For more information, visit www.ceramictilefoundation.org.

Scott Carothers
Scott Carothers is the Acdemic Director for the Ceramic Tile Education Foundation (CTEF) and is responsible for the creation of the Certified Tile Installer (CTI) program, and is involved in the creation of the Advanced Certifications for Tile Installers (ACT) program as well as providing training to others in the tile industry.
Carothers has been involved in the ceramic tile industry for nearly 40 years and was the owner of a successful retail and installation firm prior to CTEF. He has served as President and Chairman of the Board of the National Tile Contractors Association (NTCA), Chairman of the NTCA Technical Committee, was named the NTCA Tile Person of the Year in 2005, and the NTCA Ring of Honor recipient in 2013. He is a voting member of the ANSI and the TCNA Handbook committees.


