


Born to Fail
We have spent considerable time reviewing the tile installation tricks used by improperly-trained tile placers that are very questionable, and almost always fail. The first in our three-part series was the topic of spot bonding (September and October 2022) followed by its cousin, the Miami Sandwich (December 2022). Now we will look at their other cousin, the Jersey Mud Job (JMJ).
As with the other two, the Jersey Mud Job, when placed over a wood structure, does have a few similarities to the Tile Council of North America (TCNA) Handbook detail F145.The following limitations, requirements, preparations by other trades, and movement joints are listed in this detail as follows:
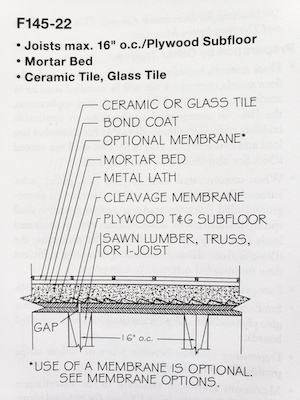
- Maximum joist spacing 16″ on center.
- Minimum 23/32″ tongue and groove exterior plywood with 1/8″ gap between sheets.
- Maximum allowable variation in the installation substrate (plywood) – 1/4″ in 10′ from the required plane.
- Maximum allowable floor member live load and concentrated load deflection shall not exceed l/360.
- Face grain of plywood shall run perpendicular to joists.
- Expanded metal lath – minimum 2.5 lbs./square yard nailed or stapled over cleavage membrane.
- ANSI A108.02-3.8 Membranes or Cleavage Membrane. Membranes shall be one of the following:
- Roofing felt: 15 lb. asphalt saturated
- Polyethylene sheeting, at least nominal thickness of 4 mil (100 microns)
- Reinforced asphalt paper, duplex type
- High solids, cold liquid applied membrane
- Chlorinated polyethylene sheeting
- Polyvinyl chloride membrane
- Asphalt laminated paper: 30/30/30 grade B asphalt laminated duplex type kraft paper
- ANSI A108.1A-5.3.1 states; Place a cleavage membrane over the substructure, lapped at least 4 in. (102 mm) at joints.
- ANSI A108.1A-1.2.2 Lap metal lath a minimum of 2 in. (50 mm).
- Mortar bed thickness – 3/4″ minimum to 1-1/2″ maximum.
- Waterproof membrane, when used – ANSI A118.10.
- Movement joints – mandatory according to EJ171.
- As you can see, F145 is very specific about the installation methods and has been tested to the American Society for Testing and Materials (ASTM) C627 – 18 Standard Test Method for Evaluating Ceramic Floor Tile Installation System Using the Robinson-Type Floor Tester and provides a Light Commercial Service Rating.
However, the Jersey Mud Job deviates significantly from the requirements of F145.
“Scratch coat method” – not recognized by the industry
In many circles, the Jersey Mud Job is known as the “scratch coat method,” which is not recognized by the tile industry. It begins many times by ignoring the needs of the existing substrate such as determining and addressing the existing floor flatness, flattening the substrate with a cementitious patch or flowable hydraulic cement underlayment (FHCU) – aka SLU – utilizing the same manufacturer’s primer, and removing non-asbestos cushioned vinyl flooring or other materials that will not properly support the tile assembly. The elimination of these critical substrate prep procedures is thought to be unnecessary in the mind of the tile placer or handyman or handywoman, which allows them to provide the consumer with a faster installation and at a significantly lower price as compared to the legitimate tile installer who follows industry standards and best practices.
What NOT to do
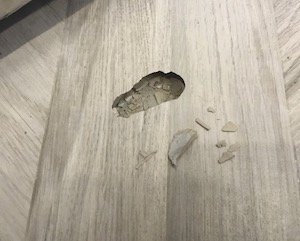
The JMJ process begins by placing the 2.5 lb. diamond lath directly on the floor without the use of the required cleavage membrane that is intended to keep the mortar from bonding to the subfloor. The metal lath edges are loosely butted together while the ANSI A108.1A – 1.2.2 (listed above) calls for the reinforcing mesh to have a two-inch overlap at all sides and ends. The mesh is randomly stapled to the substrate and covered with a layer of thin-set mortar that has been mixed with more water than recommended by the manufacturer so that it flows easily into the lath, yielding a weak mortar. At this point, some tile placers wait until the next day to allow the “loose” mortar to dry while those in the hurry-up mode spread more thin-set mortar with a notched trowel to install the tile. Both processes provide doubtful results, but the second one is a recipe for failure. The loose mortar with excess water will not bond to the newly-troweled mortar, causing them to move independently and potentially sound hollow.
Allowable mortar thickness after the tile is embedded for a conventional mortar is 1/4″, and 1/2″ for large-and-heavy tile. But with the JMJ, the mortar thickness is exceeded, causing shrinkage problems that yield unsightly and unsafe lippage between adjacent tiles.
Whereas the JMJ uses thin-set mortar beyond the manufacturer’s recommendations, method F145 utilizes a sand and portland cement dry-pack mortar that is designed and tested to function well in thicknesses between 3/4″ and 1-1/2″. This thickness variation allows the existing out-of-flat subfloor to be made flat. This is especially important for tile that is 15″ or longer on any one side, which requires the substrate to have a flat tolerance of 1/8″ in 10’.
One final requirement not yet mentioned is the minimum mortar coverage and transfer to the back of the tile, which is critical to success. ANSI A108.5-2.2.3 states, “Contact area shall not be less than 80%. Contact area on all exterior installations or interior wet installations shall not be less than 95%.” When these requirements aren’t met, the tile may crack and/or de-bond which gives the tile industry another black eye.
Known to fail – and yet it continues!
The interesting and really disturbing aspect of the JMJ is that conversations on popular tile forums and social media pages have been circulating for over 20 years and have consistently told their readers that this shady practice will eventually fail and has never been recognized by the tile industry. Over that length of time, one would think that a valuable lesson could be learned, but not so. There is, however, one advantage for the legitimate tile installer in reference to the JMJ – it is easy to tear out in preparation for a properly-installed job.
You can see the similarities between the Miami Sandwich and the Jersey Mud Job and now know that neither one of these tricks works, nor stands the test of time. The question is this: Why do tile placers continue to use these dubious tricks knowing that they don’t work? The two-fold answer is that it provides a faster installation and yield a reasonably flat tile surface. But again, getting the tile surface flat, which is required and desirable, doesn’t overshadow the need for the work below the surface to be done correctly as per tile industry standards and time-proven methods by qualified labor. As stated in our December story, do it right the first time or don’t do it at all.

Scott Carothers
Scott Carothers is the Acdemic Director for the Ceramic Tile Education Foundation (CTEF) and is responsible for the creation of the Certified Tile Installer (CTI) program, and is involved in the creation of the Advanced Certifications for Tile Installers (ACT) program as well as providing training to others in the tile industry.
Carothers has been involved in the ceramic tile industry for nearly 40 years and was the owner of a successful retail and installation firm prior to CTEF. He has served as President and Chairman of the Board of the National Tile Contractors Association (NTCA), Chairman of the NTCA Technical Committee, was named the NTCA Tile Person of the Year in 2005, and the NTCA Ring of Honor recipient in 2013. He is a voting member of the ANSI and the TCNA Handbook committees.


