


The homeowners in this project decided to use floor heating for their kitchen/dining room renovation to help provide supplemental heat for an often-used area. This area is surrounded on two sides by a perimeter wall and a large sliding glass door, which was causing substantial heat loss and had only one air vent that wasn’t able to keep up with heat loss. This, coupled with harsh Toronto-area winters, ultimately caused a lack of comfort when the family would gather for meals. They wanted to incorporate a solution to this issue in their renovation and discovered electric floor heating while researching remodeling ideas.

When they decided to install a floor heating system, their first step was to reach out to WarmlyYours Radiant Heating (www.warmlyyours.com).
Their WarmlyYours account manager worked with them to help measure the space for an electric floor heating system. In this case, the total floor area was approximately 133 sq. ft. (16’10″x7’11”). Typically the heating system will cover around 80% of the total floor area, as systems are not designed for “wall-to-wall” coverage but instead leave a small portion of the perimeter unheated (these areas don’t get much, if any, foot traffic and their omission helps cut down on both material and operating costs). In this particular project, the heated area was only about 90 sq. ft. because the family was putting in a kitchen island.
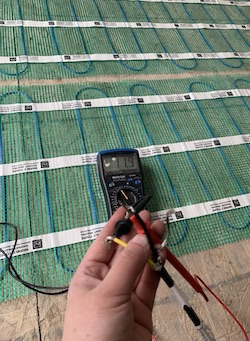
After purchasing the floor heating system and testing it with a digital ohmmeter, as per the install manual (the first of three tests that should be performed and recorded throughout the installation process), the work area was prepared by ensuring that all debris had been removed and that the compressed board subfloor was free of any items that could damage the heating wire during installation.
The heating system being used in this project was WarmlyYours’s TempZone™ Flex Rolls. This product, the most popular floor heating element sold by WarmlyYours, consists of dual-conductor heating cables attached in a serpentine pattern to a fiberglass mesh roll. This construction method allows for installers to easily and quickly lay down the heating elements and attach them to the subfloor (with hot glue or staples that go through only the fiberglass mesh), all while maintaining an ideal spacing between each run of heating wire (which ensures optimal performance and helps prevent the system from overheating and damaging the wire).
The TempZone Flex Roll is very useful for heating square/rectangular areas because the installer can simply cut the mesh while leaving the heating wire completely intact before turning the roll for the next run. It can also be detached from the mesh and used for free-form applications around something like a pillar.
Another useful installation tip for the TempZone Flex Roll (or similar products) is to install the product with the heating element facing a subfloor thoroughly cleaned of debris with the mesh facing upwards to protect the heating element from damage by sharp implements during the rest of the installation process.
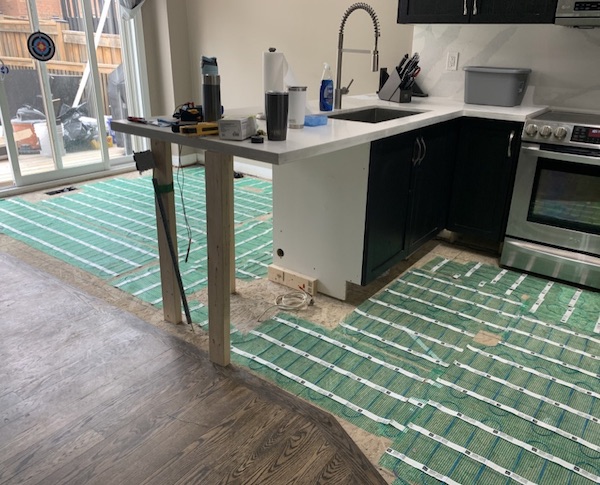
This project was designed to use a single TempZone Flex Roll (1’6″x60′) that would be free-formed around the kitchen island. Staples were used to attach the roll to the subfloor, testing the system throughout the process so that if any damage occurred it could be caught and dealt with before the tile was installed.
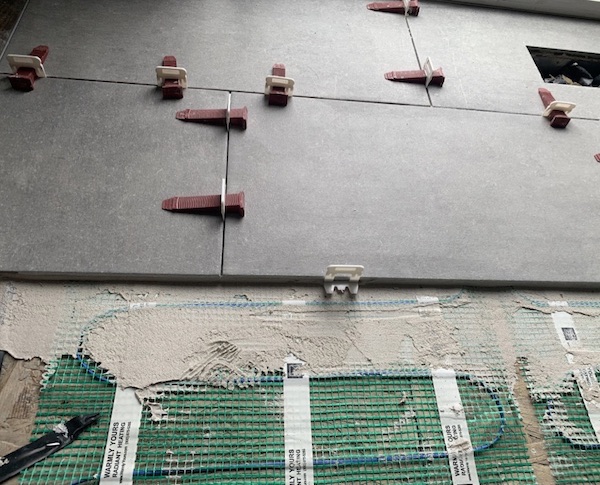
TempZone Flex Rolls have to be completely embedded in thinset or self-leveling compound/cement. This helps protect the heating wires and also increases the evenness of the heat distribution. In this project, the heating elements were embedded in latex-modified thinset and the tiles were immediately backbuttered (or flat-back troweled according to new terminology) before being placed. A wedge-based mechanical leveler/spacing system was used between tiles to keep lippage to a minimum and the spacing consistent.
The final step, after completing the tile installation, was to bring in a licensed electrician for the final electrical connections between the thermostat and the floor heating roll. Another very important element of a successful electric floor heating installation is to make sure that you wait until the thinset embedding the system (and adhering the tile) is completely cured before turning on the heating system. Failure to do so may result in the thinset becoming fragile and/or crumbling, which can have severe impacts on the longevity of the heating system and the floor itself.

Ultimately, this family was able to enjoy the warmth of the heating system. This kitchen/dining room has transformed from an uncomfortable necessity to the cozy center of their family gatherings, something they’re sure to appreciate for many years to come.


