


The “old school” tradition of mud setting tile can offer advantages in certain situations. Read on to find out what they are and when you should use this method.
“IN THE BEGINNING, TILE WAS SET ONLY…” Sorry, wrong book for reference. However, there is and should be a reverence for floor and wall mud, a skill with roots firmly planted in the tile industry that is as viable today and necessary as it was in years gone by. In this article, we will focus on floor mud with another in October to follow on wall mud.
Let’s start by getting some history and terms in order. This may vary a little by region, but it is a good starting point.
Wet set mud
Mud is and has been a method of setting tile since the beginning in the ANSI A108.1A standard where it is known by the term “wet set.” This was the only way tile was installed prior to the mid to late 1950s in America – the traditional, “old school,” wet-set method.
To accomplish this, tile was placed into tubs of water and allowed to soak in order to fill the body of the tile, which was generally white body or red body clay tile. The mud beds were mixed, placed and screeded, but not fully compacted. The installer would get onto the beds with knee boards and use a neat or pure coat of portland cement – either mixed with water to a cream or dusted onto the fresh/plastic mud bed – and set the wet tiles into the pure cement, beating them in with a rubber mallet and/or combination of a beating block and rubber mallet. The wet tile and wet/plastic bed of mortar provided ample moisture to hydrate the portland cement bond coat and grout all applied in the single process. Once cured, the installation became one thick, finished tile mass.
Thick set mud
The other term used is “thick set” and distinguished the mud work method from the most common method of installing tile today, the thin-set method. While this term “thin set” has taken on the meaning of a type of group of mortars, its true meaning is a method of installation. The mortars used in a thin-set method are properly known as “dry-set mortars.”
So, as you wrap your head around those thoughts, you can see how mud work is a foundation for tile installation and many of our practices came from mud. Hopefully this brief explanation gives insight into how much skill and knowledge was required to get the timing correct in an old-school, wet-set method, taking into account the time of year, temperatures, working off knee boards, and orchestrating the labor needed. With wet setting, you better have your cuts correct the first time; if you missed and had to replace a tile, you were pulling mud and had a mess on your hands.
As tile evolved, so did setting methods
Ok, so you might be asking, “Why do we not just go back to a pure wet-set method?” Answer: the tile! As tile evolved, porcelain tile became the standard body for many tiles. By definition, porcelain tile has an absorption rate of less than .05 %. So, you could place a porcelain tile in a tub of water and it will never absorb enough water to hydrate the bond coat of pure portland cement. That is why ANSI has method A 108.1B, which allows the mud bed to cure, then thin-setting tile to it (which is a preferred method). There is also A 108.1C, which is contractor’s choice of a wet set or cured mud bed. So as not to mislead anyone, you could wet set a porcelain tile today by placing the mud beds and using a dry-set or latex dry-set portland cement mortar as the bond coat. This method of “wet setting tile” is sometimes referred to as a “fat mud” method.
Why we mud floors
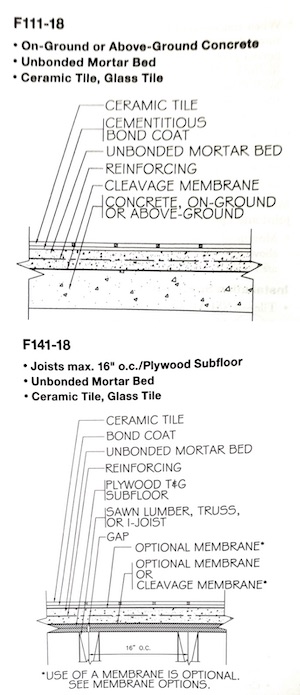
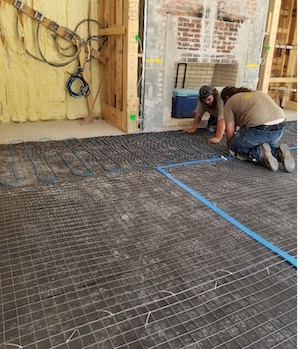
Today D.W. Sanders still muds most of the floors it sets. There are many methods using mud in the TCNA Handbook for Ceramic, Glass and Stone Tile Installation, but Sanders’ go-to methods for floors are TCNA F111 over concrete, and method F141 the primary method for setting over plywood subfloors. Both of these methods use 2″x2″ wire reinforcement in the mud beds that are unbonded to the substrate. “We prefer to be isolated from the substrate,” Sanders said. “That protects our work from substrate movement that we cannot predict and that is beyond our control.”
Other reasons to mud floors include the following: the bed’s depth can be adjusted for tile and stone thickness, the installer can obtain a desired elevation needed to meet other surfaces or control the rise needed for steps, the installer can produce a perfectly flat floor, and perfectly level floor can be created when needed. In addition, when required, mud can be used to slope the floors and create a predictable slope that takes advantage of the tile or stone that is being installed.
“With mud, we have control and control equal’s profit,” Sanders said. “When we have ungauged terracotta or stone, we fat mud/wet set the floor using string line to keep us in plane. While flat and level floors are possible with other materials such as self-leveling underlayments (SLU), they do not offer the flexibility of mud. Finally, mud gives us a competitive edge with a skill set that can address site problems that others cannot.”
The basic outline of a mud floor project; what you want to know
The key is planning and coordination. When mudding a floor, you take up a lot of real estate and other trades cannot be in the way. You must create a path with ramps from the mixing station that a wheel barrow can move over and through to move the mud to the floor.
Mix design for floor mud is a big consideration. ANSI A 108 states mix design is 1-part portland to 4-part damp sand by volume.
“Due to our local materials, we have adjusted this over the years with help of local materials vendors,” Sanders said. “We also use pre-mix, mud in a bag. Many manufacturers are producing such products, some in even in faster-setting versions that are especially helpful on small floors.”
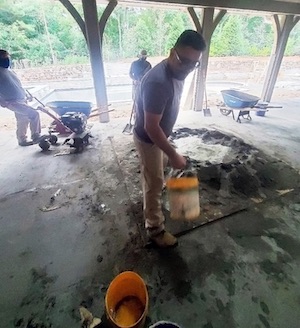
When site mixing, you want to get a tougher blend of sand and cement. D.W. Sanders blends mix mud one of three ways: with a shovel, a tiller, or with a mixer. The company has invested in both electric and gas mixers, so the tiller method has been abandoned and shovels are only used on small floors.
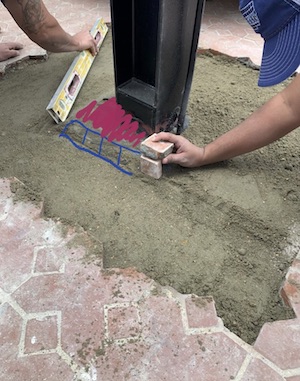
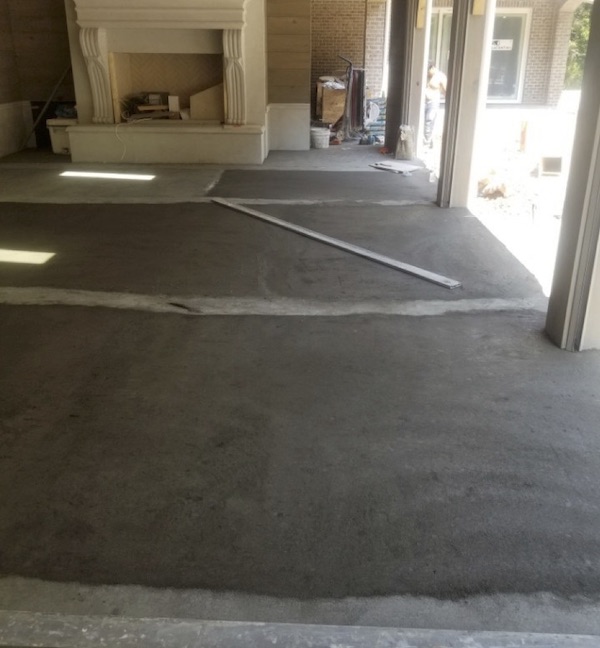
When site mixing, the key is starting with damp sand to control silica, then adding cement, then any additional water to make a dry pack. Next, the benchmark of final finished floor is established and after subtracting tile and bond coat thickness, dot screeds are placed with a straight edge and level around the floor. (Today crews have been using lasers to speed this process up and do not need a straight edge). Once elevation is established, columns of mud are placed between the dot screeds, wire is pulled into the bed and compacted, then installers screed and finish the surface.
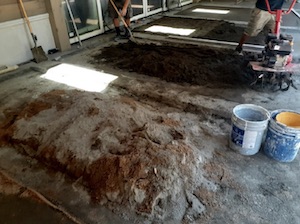
Sanders said, “We then fill between the screeds as we go, finishing the bed with a wood float and flat trowel. On larger floors, we cut the screeds at an angle, allowing them to cure. We bond the fresh mud into the screed the next day with a slurry coat of cement or dry-set mortar. This process continues until the floor is finished.”
If we have so inspired you to add mud methods into your bag of installation techniques, rest assured you can learn it. Mud is not a mythical technique that only a few can attain. However, it does take time to get the feel and learn how to screed and finish. And it takes time to gain the experience and the understanding of how cement works with sand in different environments.
But rest assured, the one thing all mud men and women do like to do is share. So, just ask, as we are here for all.
Don’t assume old techniques work with new technology
If you will indulge me to take us down a rabbit hole in this section, I want to explain how old techniques do not always transfer into current methods. As discussed in the body of the story, in a wet-set method, it is/was important to beat the tile into the fresh mud. It seated the tile, obtained the coverage requirement, and gave you a flat floor. The reason a beating block/rubber mallet worked so well was due to the wet mud, and we were taught to use them on every job.
The problem is that this technique was embedded into our industry, and handed down with the right intention but not much thought as to why. This was until we figured out directional troweling with thin-set mortars. So, in a wet-set method, beating the tile in with a beating block or rubber mallet is correct. In a thin-set method, beating the tile will not improve coverage and will only break the tile. Instead, learn the correct directional troweling technique to work with “new” thin-set mortars.

John Cox
John Cox is the owner and president of Cox Tile, Inc., of San Antonio, Texas. Cox is a lifetime Texas resident and has been in the tile industry since 1975. He launched Cox Tile in 1981 as a full-service, high-quality tile contracting company, and personally oversees all projects and work crews to ensure the quality of workmanship and complete customer satisfaction.

Woody Sanders
Woody Sanders founded DW Sanders Tile & Stone in 1994. Following the footsteps of his Grandfather AW Cook who started his tile contracting business in 1929, he grew up in the tile industry, becoming a journey man tile and stone setter at a young age. In college, his focus of study was in the school of Environmental design. After college, he worked as technical service manager for a mortar and grout manufacturer before starting his own tile contracting firm. His strong technical underpinning shows up in the company motto: “Craftsmanship by the standards”. Woody, a Certified Tile Installer, serves on NTCA Technical and Educational Committees, as well as the Regional Evaluator for Ceramic Tile Education Foundation. Woody is committed and passionate about nurturing and educating the young work force. He was the featured speaker at Covering’s about recruiting and retaining future industry workforce. DW Sanders Tile & Stone sponsored CEFGA in the last 3 years, working with area high schools which support tile education in the vocational tech programs.


