


As promised last month we will spend time on the subject of wall mud. Again it starts by looking to the three ANSI standards for wall mud:
• A108.1A wet set
• A108.1B cured bed thinset method
• A108.1C
This standard is outlined in the current May 2020 ANSI publication on page 21. These standards provide important information on types of materials that are to be used for tile set in a wall mud assembly.
In the hands of a craftsman, wall mud is not just a way to prep, but becomes an art unto itself. We both came into the industry with wall mud, and wet setting wall tile was the trait of a journeyman tile setter’s talent. Having attained those skills gives you options. But much more importantly, mud-setting is a method of installing tile that is viable today as ever, and we both use these methods.
Where we use mud
Wall mud is used on walls, ceiling, benches, niches, domes, curved walls, arches, custom built tubs, swimming pools, fireplace surrounds, tub surrounds, showers, and door jambs, as well as radius tile structures with odd angles. Mud is used in both interior and exterior tile and stone projects where wall flatness is critical. It’s suitable to every type of wall tile in dry and wet areas and is one of the most versatile substrates for tile. And in some cases, it is the only one.
So why mud walls?
“We still mud all walls in showers and tubs,” said John Cox, of Cox Tile in San Antonio, Texas. “We use this as a competitive edge when selling our work. Some will imply they can use alternative products and have the same results. Possibly, but it will require a lot of filling, rendering, and framing to get the same result. We know our walls will be flat and plumb every time. Poor framing lumber and poor craftsmanship of framing make it difficult when using a backer board or foam product for a substrate. Mud corrects those deficiencies.”
Sanders added, “Wall mud in a pre-packaged form is used on every project to render walls square and flat over cementitious backer units (CBUs) or concrete masonry units (CMUs) and plumb in most cases. We mud our shower door jambs and knee walls to square, and plumb the jambs for a clean finished tile project. We move to a full lath, scratch, mud wall to adjust ‘tile line dimensions.’ This is the beauty of mud. We can adjust the wall’s depth to make the tile work full tile to full tile without a cut. You can accomplish this by other means, but not nearly as effectively as once you master mud work.”
Protect your surfaces
Mud is a messy business, especially when you first start learning, so plan accordingly. Depending on the site, mud use requires a lot of covering and protection. Start with the mixing station: whether a mud box or mixer, you need room. Walk way into the area of work and cover surrounding areas, taping off where the mud wall is to terminate. This will be job site specific, but you have to protect.
Prep
Wall mud starts with prep. For the proper results, place your vapor barrier without tears. Any opening and penetrations such as niches, plumbing, window jambs, etc., must be properly waterproofed to protect the framing and adjacent spaces. This protection may come from the addition of a waterproofing membrane placed on top of cured mud be but it can also be accomplished with bitumen sheet membranes and tapes applied to framing.
Metal lath or wire is fastened to the wood or metal framing with galvanized nails, screws, or staples. Then depending on local code, apply a flexible sealant over each fastener where the vapor barrier has been penetrated. Fasten the lath with the long side of the sheet placed horizontally, cups up. Determine this by running your hand slowly over the lath – long side to long side – and feel which direction is rough (origin of the phrase, “rough is up”). Install the lath, overlapping sheets 2″ in both directions. Be sure to pull the lath tight onto the framing.
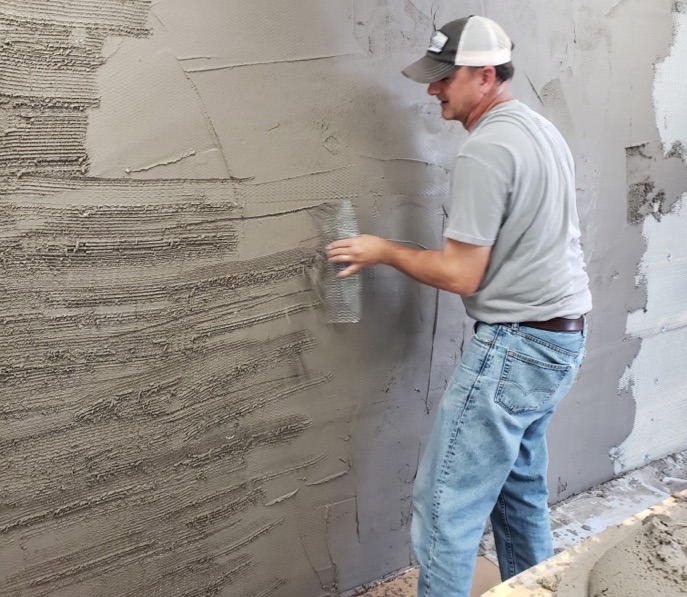
Next, apply a scratch coat to fill the lath, and comb with a plaster scarifier while mud is still plastic, and allow to cure. Look to the ANSI standards for mix design of wall mud.
The basic outline of a wall mud project
Get your materials and tools in order before you begin. Tools you will need include hawk, flat trowel, feather edges and wood float. Check your walls for square and plumb, taking note what needs correcting. (Check out the NTCA YouTube channel for a great video on this subject from Randy Fleming.) For long walls, you may want to chalk a line on the floor as a reference point.
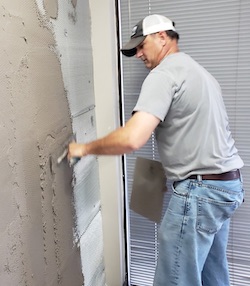
Dampen the scratch coat with water in a pump-up mister. This keeps the fresh mud from flashing and improperly curing. The scratched furrows are what the fresh wall mud locks into.
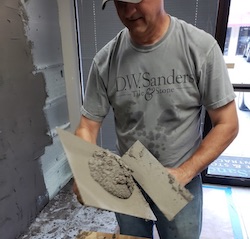
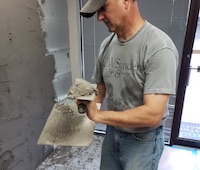
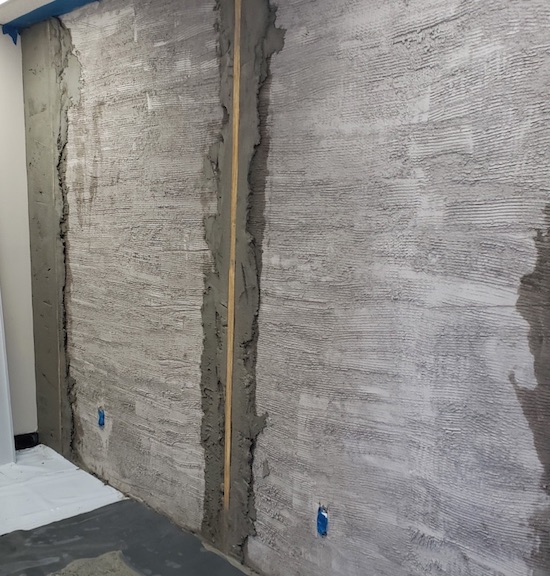
Hawk mud into a continuous vertical column. Then dampen your fitted wood float strips on both sides. Place the float strip into the fresh mud, and using the longest level that will fit, place it onto the float strip and tap/adjust to plumb. Place additional columns of mud strategically so that the feather edges are always riding on two float strips.
With strips in place and plumbed and squared, use your hawk and trowel to fill mud between the float strips slightly thicker than the strip. Once filled, use your feather edges in short and long sawing motions to cut the excess mud in plane with the float strips. Place removed mud back on mud board for reuse. Always keep your feather edges and trowels moving. When you remove excess mud from the wall, never just pull the edge straight back or you will pull your mud work right off the wall.
p.p1 {margin: 0.0px 0.0px 0.0px 0.0px; line-height: 10.0px; font: 9.0px Optima}
Practice loading the hawk with mud and loading mud onto your trowel.
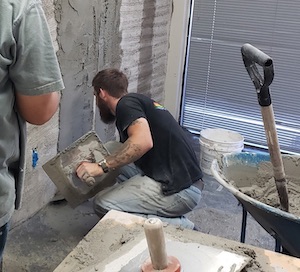
With wall filled and excess mud in plane, remove float strips. Accomplish this by using the sharp corner of the trowel to cut around the float strip and carefully get behind the strip, loosening it as you go from the mud. Finally, fill the cavities and any low spots in the wall with fresh mud. Use a wood float (not a flat trowel) to cut off excess mud and rub the bed out in a circular motion. This will leave the bed slightly rough with some small voids that will be covered with tile.
These are the basics of mudding a wall. There’s lots more to be said about the subject. Mud mechanics love to share, so just ask. Also check out the Mud group on Facebook for more discussion.
The early days of mud, with John Cox
John Cox, of Cox Tile in San Antonio, Texas, remembers the early days of setting tile with mud, before cement backer board was available .
“When I started in the industry, backer board had not been created. Paul Dinkel, who ultimately created WonderBoard®, was working on it, but it had not hit the market. Mud walls were the only way to install tile.
“Your everyday tool arsenal for wall mud was a shovel, mud hoe and mud box. In our area, the formula for a tub surround was a 1/2 bag of portland cement, 1/2 bag of masonry cement, and 20 shovels of sand. Once you mixed all your ingredients, you would load up two buckets with a mud hoe to transport them to the area your mud board was set up. Then you’d dump each bucket on the mud board and add two handfuls of baking soda to make the cement hydrate so you could set tile on it immediately after you floated the walls.
“Two five-gallon buckets weighed about 80 lbs. each. It was a task, especially if the bathroom was upstairs.
“We would run after dumping the last bucket to refill before you heard the tile setter hollering for more mud: “I need more mud! Where the heck are you? What is taking so long? “While it was drying, we would get the tile boxes in place, use tin snips to cut squares of cardboard for tile spacers, then mix thinset and start setting tile. One of the benefits of not having the walls hard, was you could take a beating block, tap your tile in and make it perfectly flat.
“Sound like a lot of work? It was.”

John Cox
John Cox is the owner and president of Cox Tile, Inc., of San Antonio, Texas. Cox is a lifetime Texas resident and has been in the tile industry since 1975. He launched Cox Tile in 1981 as a full-service, high-quality tile contracting company, and personally oversees all projects and work crews to ensure the quality of workmanship and complete customer satisfaction.

Woody Sanders
Woody Sanders founded DW Sanders Tile & Stone in 1994. Following the footsteps of his Grandfather AW Cook who started his tile contracting business in 1929, he grew up in the tile industry, becoming a journey man tile and stone setter at a young age. In college, his focus of study was in the school of Environmental design. After college, he worked as technical service manager for a mortar and grout manufacturer before starting his own tile contracting firm. His strong technical underpinning shows up in the company motto: “Craftsmanship by the standards”. Woody, a Certified Tile Installer, serves on NTCA Technical and Educational Committees, as well as the Regional Evaluator for Ceramic Tile Education Foundation. Woody is committed and passionate about nurturing and educating the young work force. He was the featured speaker at Covering’s about recruiting and retaining future industry workforce. DW Sanders Tile & Stone sponsored CEFGA in the last 3 years, working with area high schools which support tile education in the vocational tech programs.


