


Iris and ARDEX convert exterior wall to interior work of art
This project consists of installing six 5’x10′ 6mm gauged porcelain tile panels (GPTPs), two stories high, in an entryway of a house addition. The design for this project was completed in 2018, including the procurement of Iris Ceramica’s Maxfine Artsy Italiano limited release GPTPs. Permitting was completed in 2019, and construction began in 2020 with the eventual install of the GPTPs in October 2021.
The success of the project is attributed to proper training and planning for the installation of GPTPs by the architect, general contractor, and tile installers. Major challenges on the project included product procurement, substrate preparation, and the general complexities of working with GPTPs during install – especially when going two stories up.
GPTP converts exterior wall to interior art canvas
Homeowners Ryan and Claire Rosston in Boise, Idaho, wanted to add a multipurpose basement to their existing house and to enclose an outside entryway to connect the new space to the existing space on the second level. The original house was constructed in 1979 by an art dealer; the home has uniquely modern features of open and bright functional spaces, soaring ceilings, and lots of natural light to invite the outdoors in and highlight artwork. The homeowners wanted to stick with this design concept but expand it to showcase modern and artistic tile because Ryan worked in the industry for the wholesale tile distributor The Masonry Center.
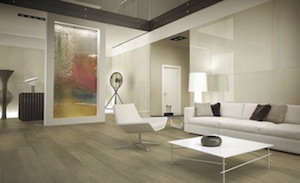
Enclosing the outdoor staircase converted an exterior wall to a canvas of an interior wall with lots of potential. Instead of typical artwork that may hang on a wall, the homeowners wanted to install creative GPTPs that they saw in a design catalog by Iris Ceramica. The technology was new and exciting and would be the statement piece of the house.
Design and procurement
In order to install such a large piece of tile artwork, the architect – Robyn Salathe of MA Architecture Studio – had to plan for the installation including layout and constructability.
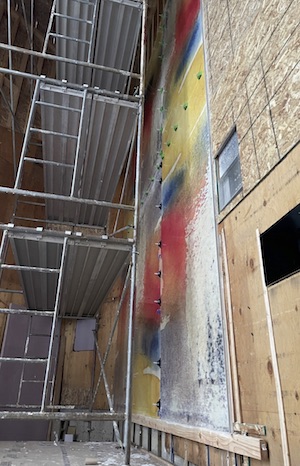
The wall space was expanded to accommodate three panels side by side to avoid any tile cuts and to showcase the artwork in its entirety. The exterior plywood sheathing was kept in place after removal of the siding to maintain the structural integrity of the wall. Appropriate tile backerboard would be installed over the exterior sheathing to create a suitable substrate ready to receive tile.
The installation of the GPTPs also had to be scheduled to occur when the space was ready to receive the tile but also at an early enough construction stage that the panels could be handled and installed in the space unobstructed and kept at full length.
The homeowners contacted Iris’s U.S. sales representative for assistance in procuring the material but learned that this product was not available in the U.S. or Europe any more. However, Iris’s factory in Italy agreed to a special production of the product as a goodwill gesture for this project. A purchase order was cut in the summer of 2018, the manufacturing process began, and the material arrived in Boise, before the snow fell during the winter of 2018-19.
Planning and execution
Success of projects typically starts with good planning and communication. This project was no different.
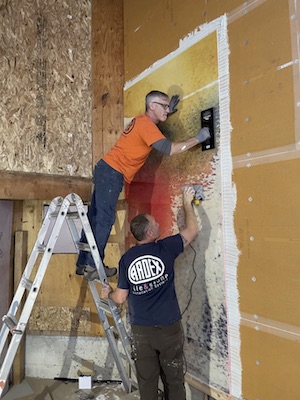
The installation of GPTPs typically requires a team of at least four individuals to successfully complete in a timely (and easier) manner. One person is dedicated to mixing thin-set mortar because a lot of it is needed – roughly 1 to 1.5 bags of mortar per panel. Two other folks apply mortar to the substrate and the back of the tile panel. The last person is responsible for collapsing the mortar ridges, forcing air out from behind the panel, and promoting edge-to-edge coverage of the panel. This is accomplished using a beating paddle down the spine of the panel and then working outward to the edges with a high-speed sander outfitted with a pad and micro-fiber cloth. When installing multiple tile panels, a lippage control system is also required to minimize lippage between tile panel edges. The crew must work as a team to move the panels.
Due to the uniqueness of the material and uncharacteristic installation methods for GPTPs, qualified labor and proper tools are recommended. Individuals should be well versed in ANSI A108.19 procedures and requirements for installation of GPTPs, and have attended installer qualification programs/trainings offered by tile, sundry and tool vendors.
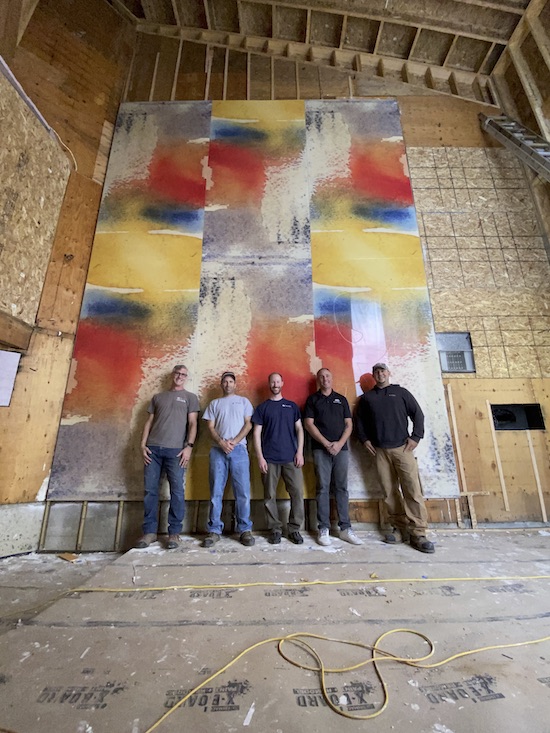
Ryan enlisted the assistance of William White and Ryan Willoughby of ARDEX and assembled a team consisting of local tile contractor Husein Kantarevic of Precision Flooring, the general contractor Clearspan Carpentry, lead subcontractor Galli Construction, and some additional labor (consisting of friends) when going two stories up with the panels. Half of the team were qualified labor for the installation of GPTPs and would lead the installation effort.
Tools and materials
In addition to standard tile tools, the following specialized tools were used on this project for the install of the GPTPs:
- Two heavy duty saw horses as a work station;
- One DTA suction cupped frame to move the tile panels;
- Four Euro trowels;
- One Raimondi coated beat-in paddle;
- Two high-speed sanders with pads; and
- One MLT Lippage Control System Kit with protective pads.
The following sundries were also selected based on their performance characteristics:
- Schluter Systems Kerdi-Board and Seam Tape;
- ARDEX X77 Microtec Fiber Reinforced Tile and Stone Mortar;
- Schluter Systems Jolly Edge Profile; and
- Silicone caulk.
Of these materials, ARDEX X77 mortar was the most vital selection due to its 60-minute open time, three-hour pot life, and outstanding sag resistance, flexibility and strength. The mortar made installation a breeze.
Substrate preparation
The first major challenge of the project was to create a flat and suitable substrate ready to receive the GPTPs. The Tile Council of North America (TCNA) recommends a substrate variation no greater than 1/8″ in 10′ and 1/16″ in 24″ for the installation of GPTPs. This tolerance must be achieved to avoid potential damage to the panels when installing, and to achieve success when installing multiple panels.
The existing structure was not flat since siding was pulled off the walls, exposing the exterior plywood sheathing. To remedy this condition, furring strips were worked by hand using a sander and level laser guide, and installed over the plywood into the underlying studs (spaced 16″ O.C.). The acceptable flatness was then verified again with the level laser and a straight-edge level, and corrections were made as necessary. Following the application of the furring strips, 1/2″ KERDI-BOARD was installed into the studs in an offset pattern and seams taped. The wall was now ready to receive tile. The approximate area of install was calculated based on the actual dimensions of the tile, edge profile thicknesses, grout joints, and tile layout.
Preparing to install GPTP
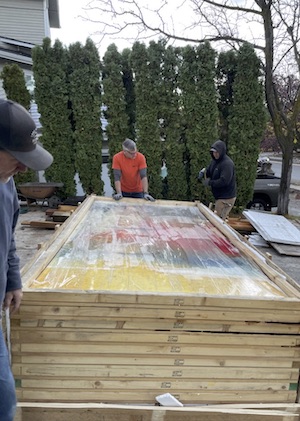
Prior to the install date, the tile panels were delivered to the site in a specialized flat crate to a laydown area in the driveway. The crate was then disassembled so the panels could be exposed and inspected for damage prior to moving. There were some slight water marks along some of the edges of the tile from weathering during storage for two years outside under a tarp but the marks were barely visible with the artistic design of the tile and seemed to look natural.
The project was also not immune to supply chain issues of the pandemic and the space was not dry-in due to umpteenth backorders of the windows. With the forecasted atmospheric river precipitation event of October, the space was tented and temporarily heated to shield against the elements and to raise the temperature above 50 degrees Fahrenheit as a best practice to accommodate mortar working and curing temperature ranges.
Lastly, workstation areas were identified for the mixing of mortar and applying thinset to the tile panels.
GPTP installation – Day 1
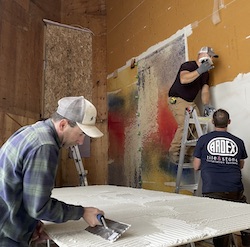
The day started at 8:00 a.m. with a crew of six. The overall goal was to install the panels at an average rate of one per hour, starting with the bottom course, taking a break for lunch, assemble scaffolding, and installing the final three panels up high in the afternoon to be done by 5:00 p.m. – essentially, installing 300 sq. ft. of wall tile in one working day.
Prior to moving any panels, a dry run was completed with the DTA suction cupped frame without a panel to assess for tight constriction areas, plan for movement, and to improve team communication. Pipe insulation was applied to sharp corners encountered, and team assignments set for the actual movement of the tile from the crate to the workstation to the wall.
The DTA suction cupped frame was expanded to its maximum size, and some additional handles added to assist with moving the 5’x10′ tile panels. The suction cups and the tile panel surfaces were cleaned prior to applying the frame to the panels. The location of the suction cups was adjusted on the frame for each panel to areas of the tile surface where a good suction could be achieved because the surface was not flat with its artistic and random coating.
The first panel went up slowly and sped up from there as everyone became familiar with the flow of activities and work assignments. The first panel was installed at 10:30 a.m., second at 11:30 a.m., and third at 12:30 p.m. Mortar was cleaned from the grout joints using sponges and paint brushes, and the MLT lippage control system used to fine tune lippage between the panels. The only issue encountered during install of the first course was that the first panel was not entirely flat and had to be braced with some blocking to hold its top edge against the substrate while the mortar cured over lunch.
Following lunch, the work crew expanded to nine individuals and four levels of scaffolding were constructed by 2:00 p.m.
Another dry run was completed with the entire team, a new workstation identified for applying mortar to the tile panels as workspace decreased with scaffolding, and work assignments handed to everyone. The morning crew led the installation effort and the additional help assisted with lifting the tile panel with the DTA frame up the four levels of scaffolding. Two individuals started the lifting down below as the remaining seven folks were spread throughout the scaffolding. As the tile panels were passed up, the bottom people climbed the scaffolding to assist on the upper levels.
A few sets of four shims were used as supports to set the bottom edge of the upper tile panels to the upper edge of the lower tile panels and tile panel embedded into the substrate mortar. Then the panel was moved into correct location with minor movements and communication coming from the four corners of the panel where people were stationed on the scaffolding. When alignment was set, the support shims were removed, and the tile panel slid down into place slowly to the correct grout joint thickness. This method was used to allow the mortar to take the weight of the panels in the air, protect the tile edges, and allow for proper time to make any alignment adjustments. The flexibility and strength of the mortar saved everyone’s backs.
The day was completed by 5:00 p.m., including site cleanup.
GPTP installation – Day 2

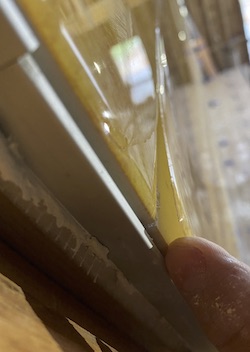
Crew removed the MLT lippage control straps and caps, cleaned the grout joints and tile surfaces and applied translucent silicone caulking to joints, which married all the tile colors and shielded mortar from peeking through joints. An aerosol window cleaner made installation and cleaning of the silicone relatively easy (See ARDEX’s Industry Know-How Silicone Tips and Tricks YouTube video).
A plunge cut was also completed after installation of the tile panels to facilitate the install of a support header for a stairway landing to the second level of the house. This cut was completed cut after install to maintain the integrity of the tile panel at its strongest level during install. Prior to installation of the tile panels, the header zone was identified, and measurements taken. Following tile panel installation, the area was marked out on the tile surface, pilot (relief) holes drilled in the four corners of the zone, and the area plunged-cut out using an angle grinder.
The previously identified weathered edges showed the top sheet was pulling away from the tile biscuit in some places, like the top sheet of a ski delaminating. Crews tested silicone caulking to re-adhere the top sheet to porcelain base and brace it in place while the silicone cured. The trial was successful so the few remaining edges were repaired in similar manner.
Project takeaways
Through proper planning and training, installation of GPTPs is not daunting but fun. It is worth its weight in gold to pre-plan installation movements and activities, assemble qualified labor, and procure the correct tools and materials for these types of installations. With the ever-changing tile technologies of today, we have moved away from large-format tile to super-format tile with great artistic and design opportunities. There is a demand for these types of installations by end users, architects, and designers, and it is up to tile installers to make these dreams become reality.


