


When the time arrives that the old tile installation must go, there are a large number of items, issues, and questions that must be addressed before the demolition begins. Will it make a lot of dirt? Can the work be completed safely? Will the site need to be vacated? Are the appropriate tools available?
Invest in PPE
The most important part of this process is the safety of the person removing the tile as well as any bystanders. Operating under the assumption that nothing is going to happen is a poor choice. The list of Personal Protective Equipment (PPE) to be considered could simply include a pair of heavy-duty gloves for hand protection, well-fitted knee pads, and goggles — which fully protect the eyes from flying debris — with no gaps or openings. In order to protect not only the eyes, but also the face, a full-face shield that flips up when not needed works really well and is not difficult to wear. However, these four items may not be enough. A heavy long-sleeved sweat shirt or commercially-available, cut-resistant safety sleeves will shield the arms from flying debris which can many times act as flying razor blades, resulting in serious lacerations. These items will normally suffice for most residential jobs, but larger residential and commercial sites may require specific PPE as well as more intense procedures.
The constant pounding of a hammer or the sound generated by many of the motor- or air-driven removal tools can be detrimental to workers’ hearing. The gradual hearing loss is almost non-detectible, so the use of hearing protection devices such as ear plugs or ear buds is strongly recommended. Even better results can be achieved by using the ear-muff style hearing protection, some of which are Bluetooth enabled, providing your favorite tunes while you work. But be careful that the music doesn’t lessen the attention to the tasks at hand, possibly causing an injury.
Guarding the lungs
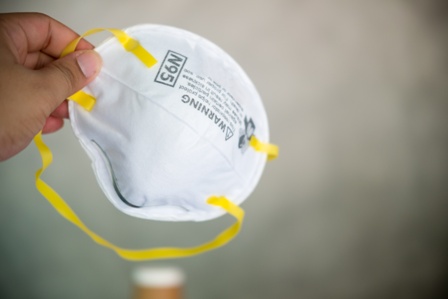
Personal respiratory protection devices may not be necessary with certain dust-containment equipped tools, or the job may require different methods which can run the gamut of a simple paper or cloth dust mask, a K95/KN95 mask, or a full-face respiration system. The level of protection and the requirements of the jobsite superintendent, architect, and/or OSHA will dictate the appropriate products. Additionally, consideration must be given to other people on the site including other workers on the project or the homeowner and their children. Some demolition devices can be fitted with dust-containment equipment which when connected to a High-Efficiency Particulate Air (HEPA) filtered vacuum, the dust can be controlled. If the removal process requires open chipping or scraping where dust containment systems may be ineffective, the use of fans may help in directing the dust away from the worker, but again, the safety of the people in the vicinity must be considered as well. The better and more complete control of generated dust may be achieved by using an air scrubber which is sized appropriately for the job. These devices take in large amounts of dust-ladened air, pulling it through one or more filters, and exhausting clean air making the area safe for all involved.
Protecting finishes and appliances
In order to contain the residual dust that may not be completely controlled through the measures above, the placement of temporary plastic walls running from floor to ceiling around the affected area is a good idea. On some projects, this type of system may be a requirement, so reading and understanding the job specifications is crucial. Failure to do so may necessitate some expensive and extensive cleaning and potentially, financial fines under the contract. Beyond that, jobsite safety is governed by the Occupational Safety and Health Administration (OSHA) of the federal government. Learn and understand these requirements for both residential and commercial sites by going the website at https//www.osha.gov Home | Occupational Safety and Health Administration (osha.gov), which is free.
Consideration should also be given to protecting the existing finishes such as cabinets, door jambs, wood trim, windows, and plasterboard walls. Appliances and doors should be the first items to be removed and properly stored. The demolition-generated debris can fly with great force, thereby damaging these surfaces. Many times, using sheets of plywood, OSB, or Masonite® can be an effective temporary shield for these areas.
Tools for the job
Now, we are ready to handle the removal of the tile from various substrates. Tools for the removal process could be as simple as a hammer and hand-held chisel, removing one tile at a time. For small projects, this method may be sufficient. However, on larger jobs, other equipment may be more effective and time efficient. Here is a short list of equipment:
- A heavy-duty, long-handled scraper or chisel
- An electric or battery-powered hammer drill equipped with a flat chisel.
- An air hammer, powered by an air compressor and equipped with a flat chisel, will speed the removal process.
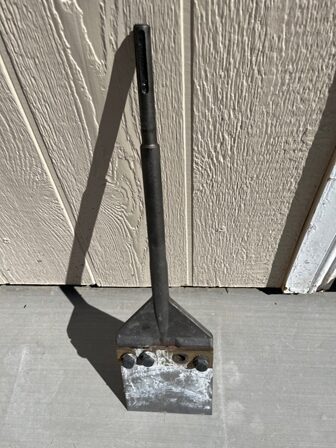
- Another tool for use with an air hammer, but isn’t commonly available from normal tile tool suppliers, comes from the automotive industry and is known as a ball-joint removal tool. This U-shaped, chisel-like tool is shaped as a tapered wedge — which in combination with the air chisel- can be very effective.
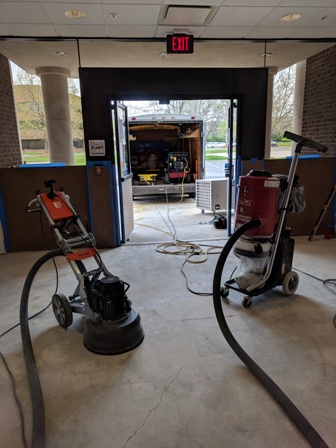
- Larger jobs may require the use of mechanical scrapers or strippers which allow the operator to stand up while guiding the motor-driven chisels or blades that oscillate to facilitate the tile removal.
- As needed, larger varieties of ride-on tile removal machines that eliminate the need for the operator to manually guide and often have to reposition the equipment can be beneficial.
If the above process removes the tile, but the thin-set mortar remains, it, too, most likely has to be removed. Here again, hand scraping or the equipment mentioned above may work, but other methods may be more effective. The use of a heavy-duty rotary floor machine fitted with a carbide-toothed plate can be very effective in mortar removal. Additionally, surface grinding equipment, fitted with a dust containment system, may be needed to bring the surface into the proper profile for the new tile installation.
Removing paint and coatings
We have learned how to remove tile and thin-set mortar, but what about paint and epoxy coatings? Paint and epoxy coatings should never be removed by use of a paint remover or solvent no matter what the chemical base. These products will emulsify the coating allowing it to sink deeper into the substrate. Once contaminated in this way, the substrate may be permanently unable to provide an adequate bond for the new installation. Mechanical removal or scarification will provide a clean substrate which will provide an acceptable bonding surface. Once any dust residue is properly removed, always conduct a water drop test to assure the substrate is ready to receive the new mortar.
Whatever tools and equipment are needed to remove tile, mortar, and contaminants as well as prepare the substrate, always select the one(s) that are best suited for the task at hand with the safety of all in mind.

Scott Carothers
Scott Carothers is the Acdemic Director for the Ceramic Tile Education Foundation (CTEF) and is responsible for the creation of the Certified Tile Installer (CTI) program, and is involved in the creation of the Advanced Certifications for Tile Installers (ACT) program as well as providing training to others in the tile industry.
Carothers has been involved in the ceramic tile industry for nearly 40 years and was the owner of a successful retail and installation firm prior to CTEF. He has served as President and Chairman of the Board of the National Tile Contractors Association (NTCA), Chairman of the NTCA Technical Committee, was named the NTCA Tile Person of the Year in 2005, and the NTCA Ring of Honor recipient in 2013. He is a voting member of the ANSI and the TCNA Handbook committees.


