


The primary function of a shower drain is to evacuate water from the shower receptor. While this function is common to all drains, the design can be very different as are the installation methods.
There are three types of drains that are included in the Tile Council of North America (TCNA) Handbook for Ceramic, Glass and Stone Tile Installation which include: the clamping ring used with a shower pan membrane; the clamping ring used with a shower drain flashing; and the integrated bonding flange.
Clamping ring drain with shower pan membrane
The clamping ring drain has been used for many years, and most times it is located in the center of the shower floor. This drain is comprised of three parts: the drain body; the clamping ring – used to provide a water-tight connection between the drain body and the shower pan membrane — and the strainer. It is very adaptable and can accommodate various mortar-bed thicknesses. However, ANSI A108.1A-2.3.6 calls for a minimum thickness mortar bed of 1-1/2” (38 mm) or consistent with local plumbing code.
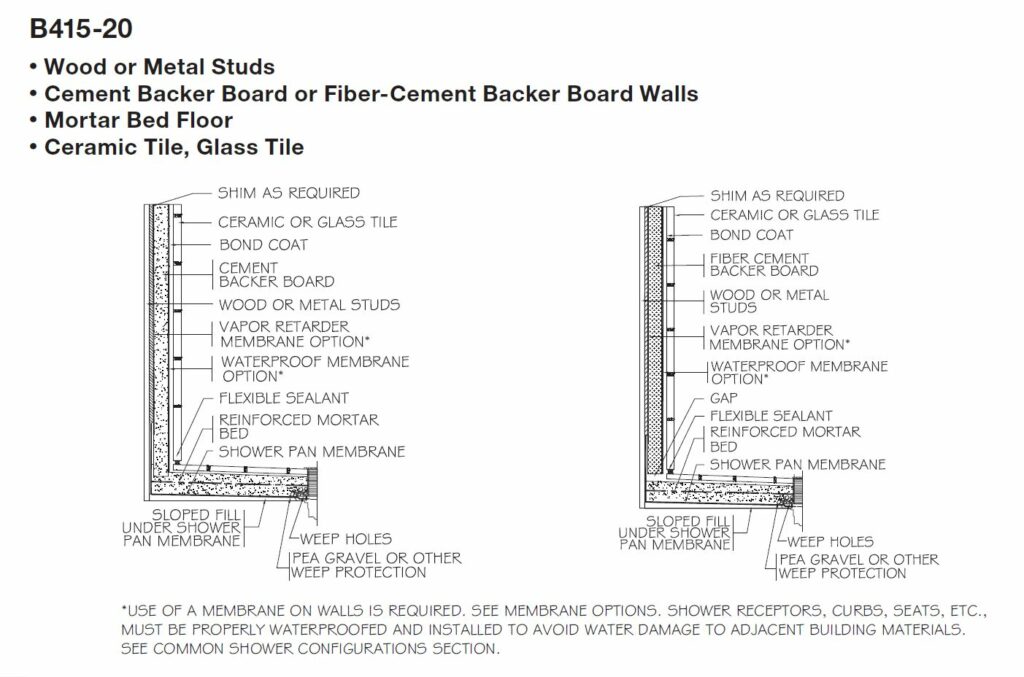
The clamping ring drain is an integral part of what is known as the water in-water out system. Here, much of the shower water is directed to the drain strainer and evacuated. Any residual water passes through the grout joints and the supporting mortar bed to the shower pan membrane which rests on the required sloped fill (1/4” per foot) to the weep holes and evacuated to the sewer system. In this system, the waterproofing membrane is located below the mortar bed and tiled shower floor as shown in the TCNA Handbook methods B414, B441, B415, B420, B426, and B431.
Clamping ring drain with shower drain flashing
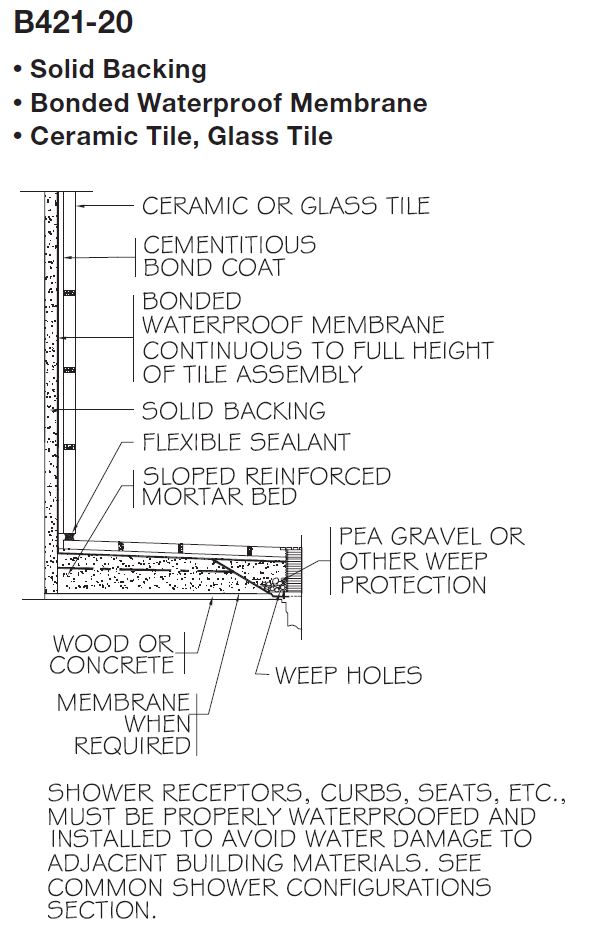
The clamping ring drain used with a drain flashing is similar to the methods listed above with the exception that there is no shower pan membrane (pan liner) under the mortar bed. Here, the sloped mortar bed base is made waterproof with the application of a topical membrane (sheet or liquid) which is connected to the drain flashing as directed by the membrane manufacturer. The installation of the clamping ring over the drain flashing provides a water-tight connection to the drain body. The remaining area, sometimes known as a divot, is filled with a 4-to-1 mortar mix to facilitate drainage to the weep holes and evacuated to the sewer system. This method is shown in the TCNA Handbook details B421 and B421C.
In the above two methods where the drain is located in the center of the floor, the required plumbing code slope to drain of 1/4” per foot will normally accommodate a mosaic tile size up to 3” x 3”. Larger sizes may be used only if the resulting lippage is within industry tolerances.
Integrated bonding flange drain
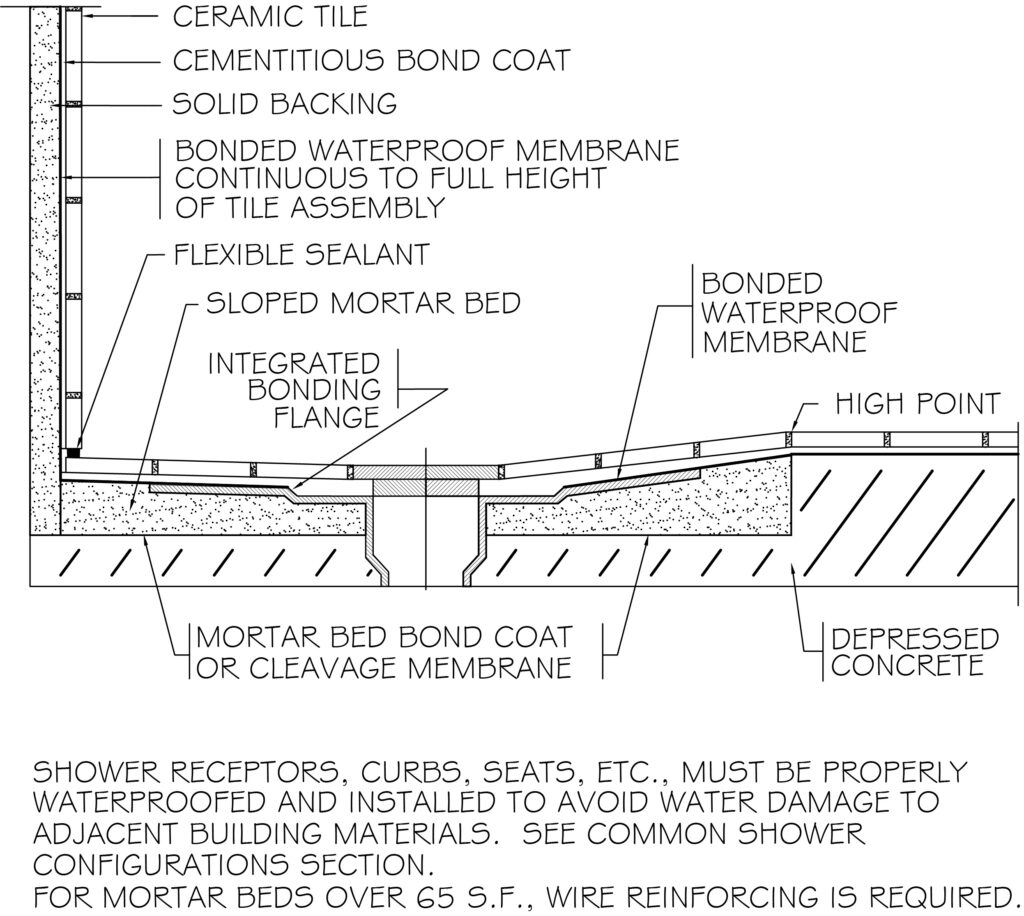
The integrated bonding flange drain is similar to the above drain flashing method in that the waterproofing membrane (sheet or liquid) is topically applied, but the membrane is connected directly to the drain body as per the manufacturer’s recommendations by means of an adhesive or thin-set mortar. However, when a liquid applied membrane is used, it is applied directly to the drain body. This method is shown in the TCNA Handbook details B422 and B422C.
Linear drains
One additional drain style which is not presently shown in the TCNA Handbook is the linear drain. These recent additions to the shower drain market provide the option of placing the drain at almost any location in the shower compartment. These options include the conventional location in the center of the floor, along the wall, or directly under the shower door. The linear drain offers the additional benefit of utilizing any tile size since the floor can be sloped, as required by plumbing code, in one direction to the drain. In this case, when the shower drain is located next to the wall, the tile could be one piece.
As always, all of the above-mentioned methods should follow the ANSI standards, the TCNA Handbook details, and the manufacturer’s installation guidelines. The use of hybrid tricks or self-developed ways of combining several manufacturers’ products and methods can be a recipe for failure. Follow the industry standards and best practices to the letter, obtain the manufacturer’s warranty, and provide a shower that will stand the test of time.
All method images courtesy of Tile Council of North America (TCNA)

Scott Carothers
Scott Carothers is the Acdemic Director for the Ceramic Tile Education Foundation (CTEF) and is responsible for the creation of the Certified Tile Installer (CTI) program, and is involved in the creation of the Advanced Certifications for Tile Installers (ACT) program as well as providing training to others in the tile industry.
Carothers has been involved in the ceramic tile industry for nearly 40 years and was the owner of a successful retail and installation firm prior to CTEF. He has served as President and Chairman of the Board of the National Tile Contractors Association (NTCA), Chairman of the NTCA Technical Committee, was named the NTCA Tile Person of the Year in 2005, and the NTCA Ring of Honor recipient in 2013. He is a voting member of the ANSI and the TCNA Handbook committees.


