


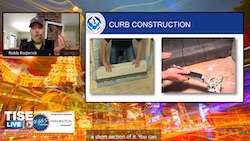
Way back in June, during the first major industry gathering at the TISE Expo in Las Vegas, Technical Trainer Robb Roderick presented a session on the TISE LIVE Main Stage at Mandalay Bay. With an assist from Training Director Mark Heinlein, Roderick offered an overview of the key critical aspects of creating a successful shower installation, focusing on preparing to do the job properly, industry-recognized shower methods, drain types, building successful curbs, and flood testing.
While you might not think this technical topic is suited to an issue dedicated to sustainability and environmental health – think again. Water can be a treacherous foe when it is not managed properly in a shower or wet area install. Without the proper materials and methods, water can rot wood substructures, create a slipping hazard, and contribute to dangerous mold. It can also become trapped beneath your stone tile creating unsightly discoloration. So ensuring you are properly tackling a shower install is one of the best things you can do for the health and satisfaction of your clients.
Best friend or worst enemy
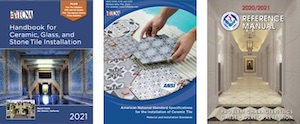
Roderick started his talk by looking at three essential industry publications: The TCNA Handbook for Ceramic, Glass and Stone Tile Installation that contains standards and methods for the industry, the NTCA Reference Manual that offers a problem/cause/cure format to address issues that come up with installations, and the ANSI manual, which has standards for tile and the installation thereof. “You may have your opinion, and I have my opinion, but this is the industry’s opinion,” Roderick said. “If you get into a legal situation, these books can help and support you; they can be your best friend or your worst enemy.”
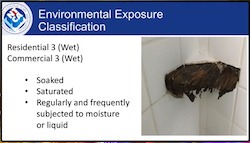
Within the Handbook is the Environmental Exposure Classification section that sorts residential and commercial installations into seven different categories by the amount of water they will receive. They go from Residential (1)/ Commercial (1) that don’t receive ANY water – except during cleanings – to 6 or 7 ratings for residential and commercial installations that are completely submerged in water. Showers, which Roderick said are the highest risk installations that tile contractors do, are generally Residential (3)/Commercial (3), and require careful selection of methods and materials.
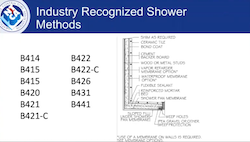
The Handbook also contains the industry-recognized shower methods, classified according to a letter/number designation for walls and floors, and are illustrated with a detail that shows all the components in the assembly. There is a section in each method called “Preparation by the Other Trades” that tells what the surface should be like before arriving at the site and who is responsible for doing it, service ratings such as light residential or heavy residential use, as well as what materials are required.
“This is a great way to communicate a lot of information simply,” Roderick said. The Handbook listsmethods that include installation of shower walls and floors, as well as those that are to be used with a prefabricated pan with only the walls tiled.
Surface-applied waterproofing
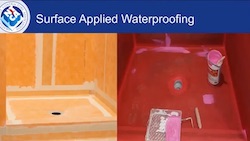
Roderick spoke in depth about methods B421 (aka the divot method) and B422 (the integrated bonding flange method, which is different from the clamping ring system used by other types of drains). He said they were unique because they require surface-applied waterproofing methods, which means the waterproofing is right behind the tile, comes down the wall, over the mud bed and connects to the drain. This can be a sheet-applied or liquid-applied membrane. Proper waterproofing is essential to any bath or shower install to make the shower envelope completely watertight before tile is installed. If wood beneath is subject to water leaks, it will swell, and pop rigid tile and grout off of the surface and, together with warm water and organic materials, will contribute to mold growth. So, getting the waterproofing right is key.
Roderick advocated a systems approach to waterproofing and drain assemblies, using components all from the same manufacturer since they are designed and tested to work together and also activate a manufacturer warranty.
Divot method and integrated bonding flange drains
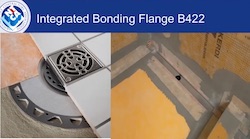
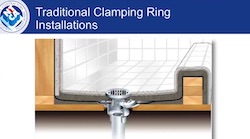
All shower receptor methods in the Handbook use a traditional drain that utilizes a clamping ring, strainer and the part that hooks into the sewer – except for method B422, which is for use with larger diameter integrated bonding flange. This method requires a floating the mud bed to the edges and bringing the waterproofing down to connect it over the flange, properly overlapping to create a seal, according to manufacturer instructions.
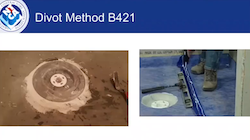
Method B421, also known as the divot method, uses a traditional clamping ring drain. Mud is floated up to the drain, divoting down and connecting a piece of liner to it. This uses a flashing that connects between the top and bottom drain flange. A bead of sealant is added between the top and bottom flange of the drain. Once the drain is in, the rest of the surface-applied membrane is installed to cover the mud bed and the wall.
Creating slope
Roderick said traditional mud bed showers with clamping ring drains work very well when done correctly. “I used to tell my guys, there are 300 simple steps,” he said. “Nothing very complicated about it, but there are a lot of steps and you need to make sure you do it correctly.”
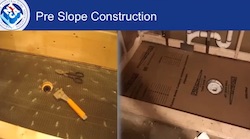
Part of doing the job correctly is making sure the waterproofing liner – or the foam preslope – is not flat to the floor, but sloped to the drain 1/4″ every foot. “Water is going to work its way through grout and mud bed and hit the liner and go out the weep holes through the flange to the drain,” he said.
Slope can be constructed using metal lath and tar paper and then float a mud bed, 1/4″ slope per foot. Or you can choose manufactured foam preslope with the necessary 1/4″ slope that is ready to receive your liner. Roderick said it’s also good to block between studs to give the liner some support, as it can fall back between the studs over time.
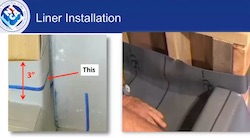
Roderick emphasized that the liner needs to be installed 3″ above the curb height all the way around the shower stall, without any screws or nails penetrating. You’ll need to patch the liner when it is cut to fold over the curb, or it can leak.
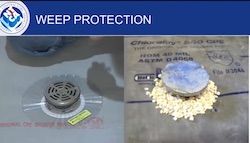
Weep protection
When installing the drain, Roderick said to cut the place for the four bolts that will adhere the bottom flange to the floor. Sealant goes on the bottom flange before it is clamped onto the liner to prevent water escaping between the liner and the bottom flange. One important detail is to protect the weep holes in the drain where the water will pass through. They can get stopped up from hard, mineralized water, soap residue or even mortar. Weep protection is often accomplished by surrounding the drain with pea gravel, which guards the weep holes and creates channels and pathways for the water to travel to the drain.
You may choose to use a linear drain instead of a traditional point drain if you are installing large format tiles on the shower. Roderick said with a conical traditional floor drain, you can’t use tiles that are larger than 6″ x 6″ due to the risk of lippage with the slope to drain. But a linear drain, which is installed at the low end of the slope, allows much larger format tiles.
Curbs also need close attention. One method is to fasten metal lath to the outside of the curb, then float that with mud, and tile over it. Or, you can choose a prefabricated curb that you fill with thinset and slide over the curb liner.
Before tiling, be sure to flood test your pan, Roderick said. “Every method requires flood testing,” he said. “Fill the pan with water and leave it overnight to see if any water escapes before tiling. This is the best piece of advice I can give you.”
Following all these steps can ensure a watertight installation that performs well for your client and is beautiful for years to come.

Lesley Goddin has been writing and journaling since her first diary at age 11. Her journey has taken her through a career in publishing and publicity, landing her the editor position of TileLetter and its special publications in 2006. Her goal is to educate, inspire, recognize and encourage those in the tile industry -- especially the tile and stone contractor.


