


Curbless shower stalls in specific installations have been considered ADA compliant when they meet the requirements of the Americans with Disabilities Act of 1990, later revised and renamed the 2010 ADA Standards for Accessible Design, which set minimum requirements for facilities to be readily accessible to and usable by individual with disabilities.
The popularity and use of curbless showers has grown tremendously and has created new opportunities for consumer selection and new markets for the tile mechanics who install them.
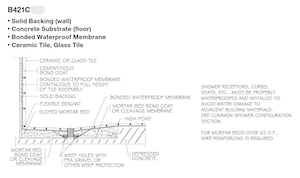
The TCNA Handbook for Ceramic, Glass and Stone Tile Installation has two details that are specifically designed and known as “Curbless Shower Receptors”: B421C and B422C. These two methods are very similar except for drain type, which we will explore later in this article. These two details share many commonalities including solid backing (wall), concrete substrate (floor), bonded waterproof membrane, and ceramic or glass tile. According to these details, both recommended uses are for construction of a shower without a curb and require a depressed concrete slab (provided by other trades) to accommodate a sloped mortar bed at the rate of 1/4″ per foot toward the drain.
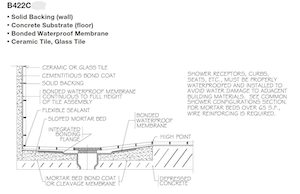
TCNA Handbook detail B422C provides a curbless shower receptor utilizing a bonding flange drain and a bonded waterproof membrane. (Courtesy of Tile Council of North America) 
TCNA Handbook detail B421C provides a curbless shower receptor utilizing as clamping ring drain and a bonded waterproof membrane. (Courtesy of Tile Council of North America)
Requirements

The ANSI A118.10 bonded waterproof membrane, sheet or liquid-applied, must be continuous, including changes in plane, and extend continuously from the drain to the full height of the tile assembly. Also, the floor and wall waterproofing must continue outside the immediate shower area one foot beyond the high point of the floor, but not beyond the tiled area. Additional waterproofing of the floor and/or walls outside the shower area may be needed to effectively contain and evacuate shower water and splash water to protect the adjacent building materials. The building design professional must specify all areas to be waterproofed and indicate membrane termination points.
In areas where shower water and splash water are not effectively evacuated, a secondary drain may be required due to the curbless design. Here again, if required or desired, the building design professional must specify the type and location of the secondary drain along with the appropriate waterproofing details.
The high point of the shower must be outside the shower area as seen in the accompanying B421C and B422C details and beyond the shower opening, door, or curtain to enable the control of the shower and splash water. The location of the high point of the floor is especially critical when a secondary drain is not utilized.
Preparations by other trades
The depressed concrete slab is provided by other trades and must extend beyond the shower area to allow the finished floor to effectively contain the water, which is often difficult to do within a curbless shower design.
Drain types and size

The B421C drain is set into the sloped mortar bed and includes the drain body, the clamping ring which contains weep holes, with a 4″ round or square strainer. This drain is better known as a part of the water in/water out system. A drain flange membrane is properly sealed with the manufacturer’s sealant between the drain body and the underside of the membrane to protect against a sewer backwash. The flange membrane is attached to the shower waterproof membrane per the manufacturer’s recommendations for a water-tight seal. Pea gravel or a weep protector is placed around the drain to eliminate the mortar from clogging the drainage system.
The B422C drain, also known as the bonding flange drain, is set into the sloped mortar bed and includes a bondable surface on its face to provide a water-tight connection to the shower waterproofing product per the manufacturer’s specifications. This drain is normally 4″ and available with either a round of square drain strainer.
Linear drains offer a whole new dimension to the design of the shower floor. These drains are available in various widths and lengths depending on the shower size, and can be placed in the center of the shower floor or installed next to the vertical wall, creating a totally new look. The metal drain grate – available in many colors and finishes – may have a slotted or circular drain hole configuration or a unique feature that provides a tileable grate with a narrow slot around the perimeter of the drain.
Creative use of linear drains is gaining popularity by placing them between the shower receptor and the bathroom floor. Using this technique, all of the shower water is pitched toward the door opening. The installer must be certain the drain is the exact size of the opening so that water cannot make its way past the drain edges and onto the undrained bath floor.
Tile installation

Traditional shower receptors utilizing a center drain, with all sides sloping at 1/4″ per foot to the drain, are restricted to the use of 1″, 2″, or 3″ mosaics or 4″ tiles in order to reduce potential lippage. This method has been used for many years and continues to be highly successful.
An artistic tile installation can be provided by an “envelope cut” regardless of tile size. In this installation, the tile is cut in a straight line from the outside corner of the shower receptor to the corresponding side of the shower drain.
However, linear drains have opened a whole new arena of design opportunities while incorporating the use of much larger tile sizes. With these drains located in the center of the shower receptor, large format tiles (15″ or larger) can be sloped from the perimeter (high points) at the required 1/4″ per foot slope to drain.
With the linear drain located at the wall line, a single slope using large-format tile from the high point of the curbless shower, at the prescribed rate, can be achieved. This method effectively eliminates “bird baths” or low spots in the shower pan and yields a sleek modern look.
Creative variations for curbless showers
Both the B421C and B422C details are designed to be installed in a depressed concrete slab, but when it comes to wood floor construction, these methods can’t be used since the cutting of floor joists is not permitted by the building code. In order to gain the needed slope to drain, there are new techniques being used that remove the wood subfloor, normally 23/32″, from the top surface of the joist, cutting it to fit between the joists, providing a recessed situation. This system requires the use of wood blocking attached to the sides of the joists or manufacturer’s products, which are attached to the top of the joist in order to support the subfloor panels. Since there are no current standards or Handbook methods for these systems, always read and follow the manufacturer’s recommendations.
ACT tests
The Advanced Certifications for Tile Installers (ACT) program provides study materials and hands-on testing that provide the successful tile installer with industry-recognized certification. The B421C and B422C curbless shower receptor certifications are the latest additions to the ACT offerings. More information may be obtained by going to the ACT website at www.tilecertifications.com.
As always, select the materials and installation methods that are supported by the ANSI standards, the Handbook details, and follow the manufacturer’s recommendations. This, coupled with hiring qualified labor that is skilled in doing it the right way the first time, will result in a long-lasting installation and a happy customer.

Scott Carothers
Scott Carothers is the Acdemic Director for the Ceramic Tile Education Foundation (CTEF) and is responsible for the creation of the Certified Tile Installer (CTI) program, and is involved in the creation of the Advanced Certifications for Tile Installers (ACT) program as well as providing training to others in the tile industry.
Carothers has been involved in the ceramic tile industry for nearly 40 years and was the owner of a successful retail and installation firm prior to CTEF. He has served as President and Chairman of the Board of the National Tile Contractors Association (NTCA), Chairman of the NTCA Technical Committee, was named the NTCA Tile Person of the Year in 2005, and the NTCA Ring of Honor recipient in 2013. He is a voting member of the ANSI and the TCNA Handbook committees.


