


We have spent a great deal of time talking about the spot bonding of ceramic and porcelain tiles, knowing that the outcome is almost always a failure waiting to happen. However, spot bonding is not the only devious trick being used by unqualified tile placers in today’s market. The latest entry, although not exactly new, is its cousin, the Miami Sandwich. Most likely this trick was first seen in the Miami area, hence the name, but it has spread like the plague to a much larger area yielding similar results – an illness that must be remedied.
The ultimate goal of any tile project is to achieve a flat transition from each tile to the next within the acceptable lippage allowances when installed over a properly-prepared substrate. Here is where the American National Standards Institute (ANSI) specifications and the Tile Council of North America (TCNA) Handbook for Ceramic, Stone and Glass Tile Installation provide the guidance needed to obtain an acceptable tile job, but we need to start at the bottom of the tile assembly.
What the ANSI specifications and Handbook say
Direct bond thin set tile installations
- The Handbook detail F113, which when properly completed, will provide a Service Rating of Extra Heavy. F113 includes Requirements and Preparation by Other Trades that are found in ANSI A108.01.
- A108.01-2.6.2.2 in part states; “Surface must be clean, free of wax, curing compound, and other coatings. They shall be dry, stable, well cured, and for tiles with at least one edge 15 in. (381 mm) or longer, the substrate shall have a maximum permissible variation of 1/8 in. in 10 ft. (3mm in 3 m) from the required plane, and no more than 1/16 in. variation in 24 in. (2 mm in 610 mm) when measured from the high points in the surface.”
Direct bond mortar bed installations over concrete
- ANSI A108.01-3.2.1 Concrete slabs 3.2.1.1
“Where the mortar bed for the tile floors is to be bonded to the concrete slabs, include the following paragraph in the concrete section:
“Screed finish concrete slabs that are to receive ceramic tile. Maximum permissible variation in the plane or slope 1/4-in. in 10 ft. (6mm in 3 m) from the required plane when measured with a straight edge. Depress slabs that are to receive tile. Properly cure slabs without using liquid curing compound or other coatings.” - ANSI A108.1A-5.2 Application of mortar to concrete floor and deck “Unless otherwise specified, place and bond the mortar bed to a concrete slab as follows:
5.2.1 Dampen clean, properly prepared concrete surface with water immediately prior to placing the bonded mortar bed. Concrete surface to be completely free of standing water.
5.2.2 Before placing mortar bed, spread a very thin continuous coating of pure portland cement slurry on the concrete surface or dust a thin layer of dry portland cement on the concrete and wet it. Broom the pure portland cement slurry or the wetted portland cement dust to completely coat the concrete surface with a thin and uniform coating.
5.2.3 Immediately apply mortar bed over the pure cement coating. Firmly tamp and screed mortar bed. Mortar bed thickness shall be a nominal 1-1/4 in. (32 mm).” - The Handbook detail F112, On-Ground or Above-Ground Concrete, Bonded Mortar Bed, Ceramic Tile, Glass Tile
This detail provides a Service Rating of Extra Heavy. The Requirements call for a mortar bed thickness of 3/4″ minimum to 2″ maximum. Mortar beds in excess of 2″ thick shall be detailed by the architect.
These ANSI specifications and Handbook details demonstrate what needs to occur for a good installation. Although somewhat comprehensive, they work and have the track record to prove it.
What is the Miami Sandwich?
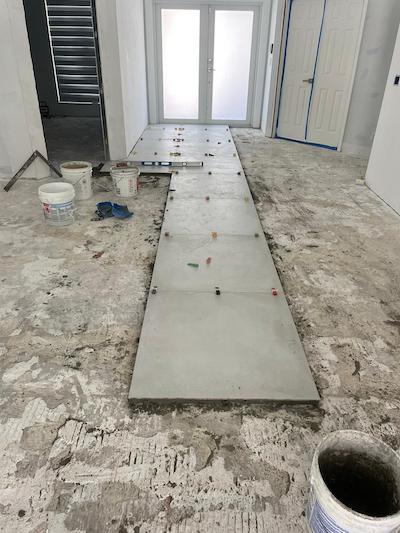
While there are variations to this trick, the Miami Sandwich spreads (not keyed into the substrate with the flat edge of the trowel as required) a loose consistency thin-set mortar (using more water than recommended by the manufacturer) over the concrete substrate. If it is new construction, the tile contractor should always check to be certain that none of these bond breaking products were applied: curing compounds, paint overspray, or other contaminants. If it is an existing surface, was there any adhesive residue from the previous installation? If so, it must be mechanically removed rather than using a solvent that emulsifies the residue, driving it deeper into the concrete rendering it unbondable.
If either of these situations exist, the new tile installation may be completely unbonded and will eventually sound hollow, allowing movement to occur. The result will be cracked grout joints and broken tile. This is not a good way to begin the project and it gets worse.
The next layer includes a sand-and-cement mixture, similar to what is known as dry pack, which is loosely spread over the thinset, providing little to no bond to the thinset. At this point, the mortar is smoothed into place, but not firmly tamped and compacted as required for a conventional mortar bed. Additionally, the mortar bed must completely support the tile with no skips or voids.

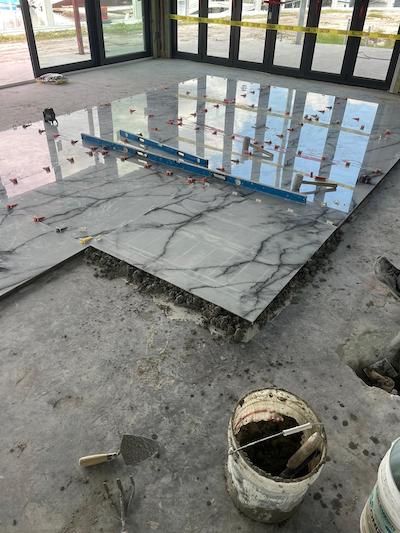
The last step before the tile is installed includes spreading thin-set mortar over the loose mortar bed without the benefit of keying it into the mortar bed for a good mechanical bond. Often this is applied at whatever thickness necessary to eliminate lippage between the tiles. The mortar thickness for a large- and-heavy-tile mortar, per the manufacturer, should be a maximum of 1/2″ thick after the tile is embedded. Here, a rubber mallet is employed to beat the tile into a flat plane with the adjacent tile, but this doesn’t utilize the necessary back-and-forth motion that gives the tile the required 80% mortar coverage in dry areas on the back of the tile as seen in the Trowel and Error video provided by the NTCA. Some installers may use a lippage control system to hold the tile in plane until it cures, but that is designed to aid in creating a flat plane, not artificially suspend the tile above the mortar.
This is a case of the haves and have nots. The ANSI specifications and Handbook details have what it takes to produce a problem-free tile installation while the Miami Sandwich does not, placing it in the have not column.
This article is focused on installations on a concrete substrate, but be careful, similar tactics can be applied over a wood substrate with similar disastrous and expensive replacement results.
There is, however, one attribute of the Miami Sandwich scheme that should be mentioned. It can provide a flat plane with acceptable lippage, which looks nice. But all of the underlying tricks that lie below will provide yet another black eye for the tile industry and fail miserably. The consumer deserves a tile installation that is completed using the time-proven tile industry standards and best practices that will stand the test of time. Do it right or don’t do it at all.
Images courtesy of John McIntyre

Scott Carothers
Scott Carothers is the Acdemic Director for the Ceramic Tile Education Foundation (CTEF) and is responsible for the creation of the Certified Tile Installer (CTI) program, and is involved in the creation of the Advanced Certifications for Tile Installers (ACT) program as well as providing training to others in the tile industry.
Carothers has been involved in the ceramic tile industry for nearly 40 years and was the owner of a successful retail and installation firm prior to CTEF. He has served as President and Chairman of the Board of the National Tile Contractors Association (NTCA), Chairman of the NTCA Technical Committee, was named the NTCA Tile Person of the Year in 2005, and the NTCA Ring of Honor recipient in 2013. He is a voting member of the ANSI and the TCNA Handbook committees.


